TM-9-2330-202-13-P - Page 332 of 552
REMOVAL - Continued
WARNING
•
Tailgate weighs over 100 lb (45 kg). Use suitable lifting device. Failure to comply may
result in death or injury to personnel. Seek medical attention in the event of an injury.
•
Hold tailgate in place before removing or installing straight headed pins. If tailgate is not
properly supported it may fall. Failure to comply may result in death or injury to personnel.
Seek medical attention in the event of an injury.
3.
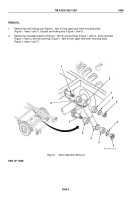
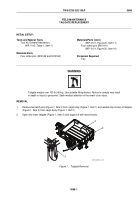
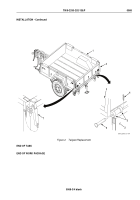
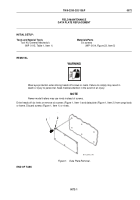
Remove four cotter pins (Figure 2, Item 4) and straight headed pins (Figure 2, Item 6) from four hinges
(Figure 2, Item 3) and eyebolts (Figure 2, Item 5). Discard cotter pins (Figure 2, Item 4).
4.
Remove tailgate (Figure 2, Item 2) from cargo body (Figure 2, Item 1).
END OF TASK
INSTALLATION
WARNING
•
Tailgate weighs over 100 lb (45 kg). Use suitable lifting device. Failure to comply may
result in death or injury to personnel. Seek medical attention in the event of an injury.
•
Hold tailgate in place before removing or installing straight headed pins. If tailgate is not
properly supported it may fall. Failure to comply may result in death or injury to personnel.
Seek medical attention in the event of an injury.
1.
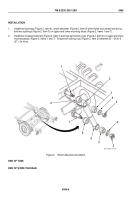
Position tailgate (Figure 2, Item 2) at cargo body (Figure 2, Item 1) and support tailgate (Figure 2, Item 2) with
wood blocks.
2.
Align four hinges (Figure 2, Item 3) with eyebolts (Figure 2, Item 5) and install four straight headed pins
(Figure 2, Item 6) through hinges (Figure 2, Item 3) with heads facing away from center of tailgate
(Figure 2, Item 2).
3.
Install four new cotter pins (Figure 2, Item 4) in four straight headed pins (Figure 2, Item 6).
4.
Raise tailgate (Figure 2, Item 2) and secure to top corners of cargo body (Figure 2, Item 1) with two latch pins
(Figure 2, Item 7).
TM 9-2330-202-13&P
0068
0068-2
Back to Top


