TM-9-2330-202-13-P - Page 343 of 552
FIELD MAINTENANCE
REAR STABILIZER REPLACEMENT
INITIAL SETUP:
Tools and Special Tools
Tool Kit, General Mechanic's
(WP
0115, Table 1, Item 1)
Materials/Parts
Four lockwashers (WP
0105, Figure 24, Item 5)
Materials/Parts (cont.)
Self-locking nut (WP
0105, Figure 24, Item 7)
Cotter pin (WP
0105, Figure 24, Item 12)
References
WP
0077
REMOVAL
1.
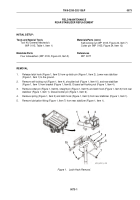
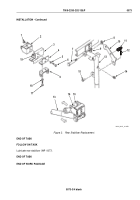
Release latch hook (Figure 1, Item 3) from up-latch pin (Figure 1, Item 2). Lower rear stabilizer
(Figure 1, Item 1) to the ground.
2.
Remove self-locking nut (Figure 1, Item 4), shoulder bolt (Figure 1, Item 10), and rear stabilizer
(Figure 1, Item 1) from bracket (Figure 1, Item 8). Discard self-locking nut (Figure 1, Item 4).
3.
Remove cotter pin (Figure 1, Item 6), straight pin (Figure 1, Item 9), and latch hook (Figure 1, Item 3) from rear
stabilizer (Figure 1, Item 1). Discard cotter pin (Figure 1, Item 6).
4.
Remove spring (Figure 1, Item 5) and latch hook (Figure 1, Item 3) from rear stabilizer (Figure 1, Item 1).
5.
Remove lubrication fitting (Figure 1, Item 7) from rear stabilizer (Figure 1, Item 1).
1
1
2
3
4
5
6
7
8
9
10
3
M116_M101_4-120
Figure 1.
Latch Hook Removal.
TM 9-2330-202-13&P
0073
0073-1
Back to Top

