TM-9-2330-238-14
CHASSIS, SEMITRAILER: 6-TON, 4-WHEEL M295A1; SEMITRAILER, VAN: EXPANSIBLE, 6-TON, 4-WHEEL M313; SEMITRAILER, VAN: SHOP, FOLDING SIDES, 6-TON, 4-WHEEL M447 AND M447C; SEMITRAILER, VAN: REPAIR PARTS, SHOP EQUIPMENT, 6-TON, 4-WHEEL M749; SEMITRAILER, VAN: REPAIR PARTS STORAGE, 6-TON, 4-WHEEL M750
TECHNICAL MANUAL; OPERATOR’S, ORGANIZATIONAL, DIRECT SUPPORT, AND GENERAL SUPPORT MAINTENANCE MANUAL
JULY 1992
TM-9-2330-238-14 - Page 370 of 462
TM
9-2330-238-14
5-23.
LEFT AND
RIGHT
REAR
DOOR
LOCK
REPLACEMENT
(M447,
M447C,
M749,
AND
M750)
(Con’t).
WARNING
Dry cleaning
solvent,
P-D-680,
is toxic and flammable.
Always wear protective
goggles
and gloves,
and use only in a well-ventilated
area.
Avoid
contact
with skin, eyes, and
clothes, and DO NOT breathe
vapors.
DO NOT use near open flame or excessive heat.
The solvent’s flash point is 100°F-138°F
(38°C-59°C).
If you
become
dizzy
while
using cleaning
solvent,
immediately
get fresh air and medical
help. if solvent
contacts
eyes,
immediately
wash
your
eyes
and get medical
aid.
1.
Clean
all parts with
dry cleaning
solvent
and dry thoroughly.
2.
Inspect
case
assembly
and latch assemblies
for ease
of operation.
3.
Inspect
locking
bars for cracks,
bends,
or breaks.
Straighten
any minor
bends.
4.
Replace
defective
parts
as necessary.
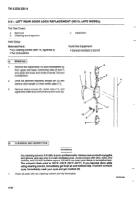
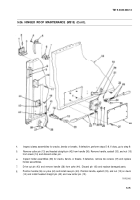
1.
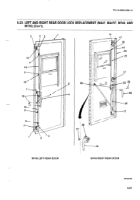
Position
outside
handle
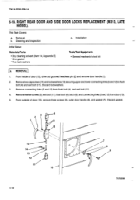
(26) and new seal (28) in place on exterior side of door (20) and install three screws (27).
2.
install
two
screws
(18) and locking
bar bumpers
(19) on door
(20).
3.
Position
case
assembly
(29) in place
on door
(20) and install
four screws
(22).
4.
Position
three
latch assemblies
(17) and upper
and lower
locking
rods
(21 and 25) in place
and install twelve
screws
(16) and new Iockwashers
on door
(20).
5.
With outside
handle
(26) in a vertical
position,
install
inside
handle
(24) on case
assembly
(29) horizontal
to
floor.
6.
Aline
holes
in inside
handle
(24) and case
assembly
shaft and install
with new spring
pin (23).
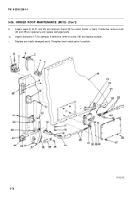
1.
2.
3.
4.
5.
6.
5-68
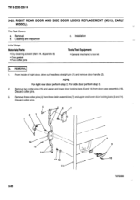
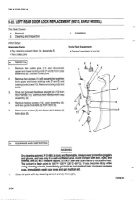
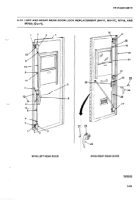
Position
three
latch
strikes
(1) in place
on door
(4) and install
nine screws
(7).
Install two
screws
(13) and locking
bar bumpers
(9) on door
(4).
Position
handle
(11) in place
on shaft of case
assembly
(6) and install
headless
straight
pin (5).
Position
case
assembly
(6) and two
guides
(3) in place
on door
(4) and
install
twelve
screws
(15) and new
Iockwashers,
Install two
bolts
(2) on ends
of connecting
link
and
locking
rod (10 and
14) with
two
screws
(8) and new
lockwashers.
Position bolts
(2) in guides (3)
and connecting
link and locking
rod (10 and 14) on case assembly
(6). Install two
new cotter pins
(12) to secure.
Back to Top

