TM-9-2330-238-14
CHASSIS, SEMITRAILER: 6-TON, 4-WHEEL M295A1; SEMITRAILER, VAN: EXPANSIBLE, 6-TON, 4-WHEEL M313; SEMITRAILER, VAN: SHOP, FOLDING SIDES, 6-TON, 4-WHEEL M447 AND M447C; SEMITRAILER, VAN: REPAIR PARTS, SHOP EQUIPMENT, 6-TON, 4-WHEEL M749; SEMITRAILER, VAN: REPAIR PARTS STORAGE, 6-TON, 4-WHEEL M750
TECHNICAL MANUAL; OPERATOR’S, ORGANIZATIONAL, DIRECT SUPPORT, AND GENERAL SUPPORT MAINTENANCE MANUAL
JULY 1992
TM-9-2330-238-14 - Page 372 of 462
TM
9-2330-238-14
5-24.
SASH ASSEMBLY
MAINTENANCE
(M313).
This Task Covers:
a.
Removal
c.
Assembly
b.
Disassembly
d.
Installation
Initial
Setup:
Materials/Parts:
Tools/Test
Equipment:
●
Adhesive
(Item
1, Appendix
E)
●
General
mechanic’s
tool
kit
●
One sash
seal
●
Four rivets
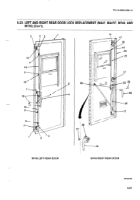
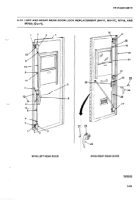
1.
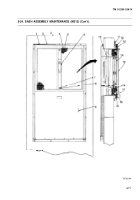
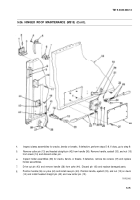
Remove
eighteen
screws
(11) and window
and frame
assembly
(18) from door
(3).
2.
Remove
15 screws
(1), guide
(2), and blackout
panel
(9) from
inside
of door
(3).
1.
Remove
screws
(10), separate
window
glass
(14), and frame
assembly
(18). Remove
seal (16) from window
glass.
2.
Turn two
latches
(17) holding
lower
end of brush
screen
(15) to frame
assembly
(18) 180°
and remove
brush
screen.
3.
Remove
plastic
cord
retainer
(4) from
edge
of screen
(5) and remove
screen
from frame
assembly
(18).
4.
Open
window
and remove
sash
seal
(19) with knife.
Discard
sash seal.
5.
Remove
four rivets
(13) securing
hinge
(12) and remove
hinge.
Discard
rivets.
6.
Remove
four screws
(7), nuts (8), and window
operator
(6) from frame
assembly
(18).
1.
Position
window
operator
(6) in place
in frame
assembly
(18) and install
four screws
(7) and nuts (8).
2.
Position
hinge
(12) in place
and install
four new rivets
(13).
3.
Install
new
sash seal
(19) with adhesive
on window.
4.
Position
screen
(5) in place
on frame
assembly
(18) and install
plastic
cord retainer
(4).
5.
Position
brush screen
(15) in place
on frame assembly
(18), and turn two latches (17)
180° to secure
lower end
of brush
screen.
6.
Install
seal (16) on window
glass
(14). Position
window
glass
in frame
assembly (18)
and install
screws
(10).
1.
2.
5-70
Position
blackout
panel
(9) and guide
(2) in place
on inside
of door
(3). Install
15 screws
(1) to secure.
Install window
and frame assembly
(18) in place
in window
opening
of door (3) and secure with eighteen
screws
(11).
Back to Top

