TM-9-2350-256-10 - Page 710 of 796
ACETYLENE CYLINDER REMOVAL
1.
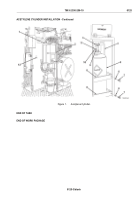
Loosen wingnut (Figure 1, Item 1) on top rear of hinge assembly (Figure 1, Item 2).
2.
Swing hinge assembly (Figure 1, Item 2) (containing gas particulate filter and portable fire extinguisher) out
of the way.
3.
Open acetylene stowage cabinet (Figure 1, Item 12).
4.
Close valve (Figure 1, Item 3), if open.
5.
Loosen nut (Figure 1, Item 11) and disconnect hull outlet tube (Figure 1, Item 10) from valve outlet
(Figure 1, Item 9).
6.
Remove valve outlet (Figure 1, Item 9) from acetylene cylinder (Figure 1, Item 5).
7.
Cap acetylene cylinder (Figure 1, Item 5) with safety cap (Figure 1, Item 4).
NOTE
Retain the lockwashers to reuse in installation and notify maintenance to replace when
mission permits.
8.
Remove four screws (Figure 1, Item 7), four lockwashers (Figure 1, Item 6), and two brackets
(Figure 1, Item 8).
9.
Remove acetylene cylinder (Figure 1, Item 5) from acetylene stowage cabinet (Figure 1, Item 12).
10.
Remove acetylene cylinder (Figure 1, Item 5) from vehicle.
END OF TASK
ACETYLENE CYLINDER INSTALLATION
1.
Remove safety cap (Figure 1, Item 4) from acetylene cylinder (Figure 1, Item 5) and stow cap in acetylene
stowage cabinet (Figure 1, Item 12).
2.
Position acetylene cylinder (Figure 1, Item 5) in acetylene stowage cabinet (Figure 1, Item 12).
3.
Align valve outlet (Figure 1, Item 9) with hull outlet tube (Figure 1, Item 10). Tighten nut (Figure 1, Item 11).
4.
Install two brackets (Figure 1, Item 8), four lockwashers (Figure 1, Item 6), and four screws
(Figure 1, Item 7).
5.
Connect valve outlet (Figure 1, Item 9) to acetylene cylinder (Figure 1, Item 5).
6.
Install acetylene regulator (WP 0053) and ensure the regulator is off. Refer to TC 9-237 (WP 0131).
7.
Turn on bottle valve (Figure 1, Item 3).
NOTE
If leak is found, tighten connections and recheck. If leaks continue, turn off bottle valve and
notify maintenance.
8.
Use spray bottle with soapy water solution to check for valve outlet (Figure 1, Item 9) and hull outlet tube
(Figure 1, Item 10) leaks.
9.
Close bottle valve (Figure 1, Item 3) and bleed acetylene at the regulator. Refer to TC 9-237 (WP 0131).
10.
Remove and stow regulator (WP 0053).
11.
Close acetylene stowage cabinet (Figure 1, Item 12).
12.
Swing hinge assembly (Figure 1, Item 2) back into position and tighten wingnut (Figure 1, Item 1).
TM 9-2350-256-10
0125
0125-2
Back to Top


