TM-9-2350-311-20-2 - Page 372 of 828
TM 9–2350–311–20–2
6–50
Change 2
6–20 ASSISTANT GUNNER’S CONTROL ASSEMBLY
This task covers:
a.
Removal
b.
Installation
INITIAL SETUP
Tools
Artillery and turret mechanic’s tool kit
(SC 5180–95–CL–A12)
Utility pail (item 7, Appx H)
Materials/Parts
Caps and plugs (item 7, Appx D)
Equipment Condition
Cannon in TRAVEL LOCK position
(TM 9–2350–311–10)
Discharge hydraulic pressure (para 6–3)
a.
Removal
CAUTION
All hydraulic lines and ports must be capped to prevent contaminants from entering the hydraulic
system and causing internal damage to hydraulic components.
NOTE
Dispose of hydraulic fluid in accordance with local regulations.
1
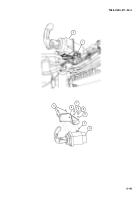
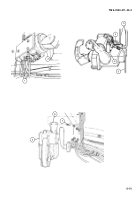
Disconnect four hydraulic tubes (1) from four ports on underside of assistant gunner’s control assembly (2).
Catch dripping hydraulic fluid in utility pail.
2
Disconnect hydraulic tube (3) at check valve (4).
3
Disconnect two hydraulic tubes (5) at manifold (6).
WARNING
Support assistant gunner’s control assembly while removing three screws from elevation control
bracket to avoid injury to personnel and to assistant gunner’s control assembly.
4
Remove three cap screws (7) from elevation control bracket (8) and remove assistant gunner’s control as-
sembly (2) and elevation control bracket.
b.
Installation
1
Aline holes in elevation control bracket (8), assistant gunner’s control assembly (2) and secure to cab with
three cap screws (7).
2
Connect two hydraulic tubes (5) to manifold (6).
3
Connect hydraulic tube (3) to check valve (4).
4
Connect four hydraulic tubes (1) to four ports on underside of assistant gunner’s control assembly (2).
Back to Top

