TM-9-2350-311-34-2 - Page 236 of 552
TM 9-2350-311-34-2
5-12 VARIABLE RECOIL ASSEMBLY - CONTINUED
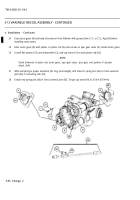
e. Installation
Use care not to scratch or damage actuating piston rod during installation.
1
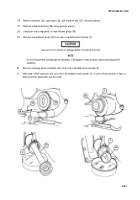
Slide outer orifice restrictor (40) into front of variable recoil cylinder (3), making sure slot of outer orifice re-
strictor is at top, lined up with lubrication fitting.
2
Install actuating piston assembly (30) approximately half-way into front of variable recoil cylinder (3).
NOTE
Aline key on rear follower with recesses in outer orifice.
3
Slide actuating piston assembly (30) further into variable recoil cylinder (3). Install rear follower group (39) at
rear of variable recoil cylinder, over rod of actuating piston assembly.
4
Install machine bushing (38) using spanner wrench.
5
Install machine key (37) and cap screw (36) using hex head wrench. Install new lockwire (35).
5-92 Change 2
Back to Top


