TM-9-2520-272-40 - Page 140 of 620
TM 9-2520-272-40
0018
INSTALL COOLER LINE ELBOW
NOTE
X200-4A Transmissions have a one-piece elbow conf guration and no separate connector
(adapter).
To remove or install the elbow on an assembled transmission, it is necessary to f rst remove
the right lifting bracket and top cover assembly (WP 0007).
Make sure the right cover assembly is turned so that the external side is up.
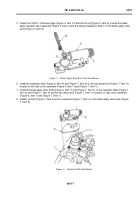
1. Using your hands, in the direction of the bend in the elbow (Figure 2, Item 1), loosen the locknut on elbow.
Loosen the locknut as far as possible.
2. Inspect backup washer on elbow (Figure 2, Item 1). Replace the elbow if the backup washer is damaged,
loose, or bent.
3. Install new O-ring (Figure 2, Item 2) onto elbow (Figure 2, Item 1). Install O-ring (Figure 2, Item 2) so that it
touches backup washer on elbow (Figure 2, Item 1).
4. Lubricate O-ring (Figure 2, Item 2) with petrolatum.
5. Inspect elbow (Figure 2, Item 1) to ensure that backup washer and O-ring are pushed up, in the direction of
the bend in the elbow, as far as possible.
6. Using your hands, screw elbow (Figure 2, Item 1) and O-ring (Figure 2, Item 2) into the right cover assembly
(Figure 2, Item 3) until the backup washer and O-ring touch the right cover assembly. It may be necessary to
lightly use a wrench to correctly install the backup washer and O-ring.
Back to Top


