MERITOR-TP-9853 - Page 20 of 32
Section 4
Assemble Brakes
16
NOTE:
Meritor KIT 1184 includes a seal driver for
RDA brakes plus a brake spring tool and an
adjusting spoon. The kit or the individual tools are
available from Meritor Aftermarket Parts and
Services, 7975 Dixie Highway, Florence, KY 41042.
6. If removed, install the plunger housing. Apply
Loctite
®
242 or equivalent to the capscrew
threads. Tighten the capscrews to 30-40 lb-ft
(41-54 N•m).
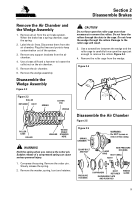
Assemble the Air Chamber
Figure 4.5
1. Install the new boot as follows:
a. Put the new boot and retainer in the
housing. Tightly fasten the retainer and
housing with nuts and bolts through two
rivet holes 180 degrees apart.
b. Install rivets from the outside of the housing
through the other two rivet holes. Use a
rivet set to form the heads of the rivets.
Tightly clamp the boot and retainer to the
housing.
c. Replace the two nuts and bolts with rivets.
2. Install the plate and push rod assembly
through the boot. Install the wedge guide on
the end of the push rod.
3. Install the diaphragm.
4. Fasten the non-pressure housing and
diaphragm to the pressure housing or
spring brake chamber by using the clamp,
bolt and nut.
Wedge Brakes With Air
Chamber Tube Support
Brackets
When wedge brakes are equipped with air
chamber support brackets, the centerline of the
tube must remain within 20 degrees of the axle
horizontal centerline. The same limitations apply
when the centerline of the air chamber support
bracket is located toward the front of the vehicle.
Figure 4.6
and
Figure 4.7.
Figure 4.5
SPRING
CHAMBER
WARNING:
Do NOT loosen or
remove this clamp.
WEDGE
GUIDE
BOOT
RETAINER
DIAPHRAGM PLATE
AND PUSH ROD
DIAPHRAGM
PRESSURE
HOUSING
CLAMP BOLT
AND NUT
CLAMP
RING
RIVET
BOOT (SEAL)
NON-PRESSURE
HOUSING
Figure 4.6
Figure 4.7
AIR CHAMBER TUBE
SUPPORT BRACKET
VEHICLE FRONT
WEDGE
BRAKES
SUPPORT BRACKET
20˚
20˚
Back to Top

