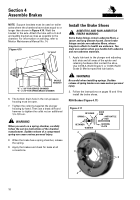
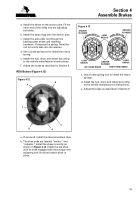
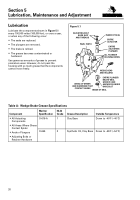
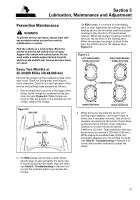
MERITOR-TP-9853 - Page 18 of 32
Section 4
Assemble Brakes
14
Section 4
Assemble Brakes
WARNING
To prevent serious eye injury, always wear safe
eye protection when you perform vehicle
maintenance or service.
Park the vehicle on a level surface. Block the
wheels to prevent the vehicle from moving.
Support the vehicle with safety stands. Do not
work under a vehicle supported only by jacks.
Jacks can slip and fall over. Serious personal injury
can result.
Remove all pressure from the air system before
you disconnect any components. Pressurized air
can cause serious personal injury.
When you work on a spring chamber, carefully
follow the service instructions of the chamber
manufacturer. Sudden release of a compressed
spring can cause serious personal injury.
ASBESTOS AND NON-ASBESTOS
FIBERS WARNING
Some brake linings contain asbestos fibers, a
cancer and lung disease hazard. Some brake
linings contain non-asbestos fibers, whose
long-term effects to health are unknown. You
must use caution when you handle both asbestos
and non-asbestos materials.
Install the Plungers and Bolt-On
Plunger Housings
CAUTION
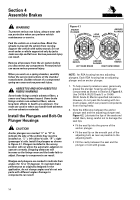
Anchor plungers are marked “L” or “R” to
indicate the side of the vehicle they must be
installed on. “L” = left (driver’s) side. “R” = right
(passenger’s) side. Install the plungers as shown
in Figure 4.1. Plungers installed in the wrong
location will not allow the automatic adjusters to
operate correctly. Stopping distances will
increase as the linings wear and the brake fails to
adjust. Damage to components can result.
Wedges and plungers are marked to indicate their
angles (12, 14 or 16 degrees). To maintain brake
performance as originally designed for the
application, do not change angles and do not mix
parts with different angles. Damage to
components can result.
NOTE:
An RSA housing has two adjusting
plungers. Each RDA housing has an adjusting
plunger and an anchor plunger.
1. To help prevent premature wear, generously
grease the plunger housing and actuator
components as shown in Section 5,
Figure 5.1.
Use O-616-A (NLGI Grade 1) or O-645
(NLGI Grade 2) Meritor-specified lubrication.
However, do not pack the housing with too
much grease, which can prevent components
from moving freely.
2. Note the difference between the anchor
plunger seal and the adjusting plunger seal.
Figure 4.2.
Lubricate the lips of the seals and
install them, being careful not to damage the
seal lips.
r
Fit the seal lip into the groove of the
anchor plunger.
r
Fit the seal lip on the smooth part of the
adjusting bolt, as near as possible to the
adjusting teeth.
r
Fill the cavity between the seal and the
plunger or bolt with grease.
Figure 4.1
ANCHOR
PLUNGER
LONG
RADIUS
ANCHOR
PLUNGER
LONG
RADIUS
ANCHOR
PLUNGER
LONG
RADIUS
LEFT HAND BRAKE
RIGHT HAND BRAKE
Back to Top

