MERITOR-TP-9853 - Page 25 of 32
Section 5
Lubrication, Maintenance and Adjustment
21
Preventive Maintenance
WARNING
To prevent serious eye injury, always wear safe
eye protection when you perform vehicle
maintenance or service.
Park the vehicle on a level surface. Block the
wheels to prevent the vehicle from moving.
Support the vehicle with safety stands. Do not
work under a vehicle supported only by jacks.
Jacks can slip and fall over. Serious personal injury
can result.
Every Two Months or
25-30,000 Miles (40-48,000 km)
Remove the plugs from the inspection holes in the
dust cover. Check for lining wear and lining to
drum clearance. Check for correct operation of the
service and parking brake systems as follows:
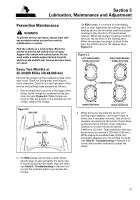
1. Some linings have a groove in the edge of the
lining. Some linings are scalloped at the four
inner corners.
Figure 5.2.
When linings are
worn so that the groove or the scallops are not
visible, replace the linings.
2. On
RDA
brakes, the linings on both shoes
should wear at approximately the same rate.
If one shoe wears much faster than the other,
use
Table B:
Troubleshooting
in Section 6 to
correct the problem before you replace the
linings.
On
RSA
brakes, it is normal for the leading
shoe to wear faster than the trailing shoe. The
leading shoe is the first shoe past the plunger
housing in the direction of forward wheel
rotation. When the plunger housing is behind
the axle, the top shoe is the leading shoe.
When the plunger housing is in front of the
axle, the bottom shoe is the leading shoe.
Figure 5.3.
3. While someone operates the service and
parking brake systems, check each brake to
make sure it operates correctly. Use a ruler to
measure movement at the center of each shoe
to determine the lining to drum clearance.
Clearance of a shoe must not exceed
0.090-inch (2.3 mm). Total clearance of the two
shoes must not exceed 0.120-inch (3.05 mm).
When clearance exceeds these limits, the
automatic adjusters are not working correctly.
Use
Table B:
Troubleshooting
in Section 6 to
correct the problem before you adjust the
brake.
Figure 5.2
GROOVED
SCALLOPED
Figure 5.3
WHEEL ROTATION
WHEEL ROTATION
WHEEL ROTATION
WHEEL ROTATION
LEFT HAND BRAKES
RIGHT HAND BRAKES
LEADING SHOE
Back to Top

