MERITOR-TP-9853 - Page 21 of 32
Section 4
Assemble Brakes
17
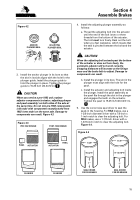
Assemble the Wedge Assembly
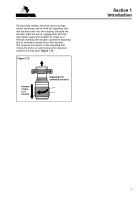
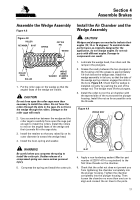
Figure 4.8
1. Put the roller cage on the wedge so that the
angled faces of the wedge are visible.
CAUTION
Do not force open the roller cage more than
necessary to install the rollers. Do not force the
rollers through the slots in the cage. Do not force
the wedge through the rollers. Damage to the
roller cage will result.
2. Use a screwdriver between the wedge and the
roller cage to carefully force open the cage just
enough to install the rollers. Install the rollers
to rest on the angled faces of the wedge and
their journals fit in the cage slots.
3. Install the retainer so that any raised lip on its
outer diameter is toward the wedge head.
4. Install the boot, spring and washer.
WARNING
Be careful when you compress the spring to
install the cotter pin. Sudden release of a
compressed spring can cause serious personal
injury.
5. Compress the spring and install the cotter pin.
Install the Air Chamber and the
Wedge Assembly
CAUTION
Wedges and plungers are marked to indicate their
angles (12, 14 or 16 degrees). To maintain brake
performance as originally designed for the
application, do not change angles. Do not mix
parts with different angles. Damage to
components can result.
1. Lubricate the wedge head, the rollers and the
ramps in the plungers.
2. Grease the cavity between the two plungers in
the housing until the grease is approximately
1/4-inch below the wedge seat. Install the
wedge assembly in its bore, so that the tabs of
the wedge spring retainer engage the slots in
the bore.
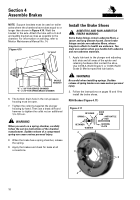
Figure 4.9.
Check that the wedge is
installed correctly by pushing the end of the
wedge rod. The wedge must lift the plungers.
3. Install the collet nut on the air chamber with
the tapered side of the nut toward the plunger
housing. Install the nut as far as possible onto
the threads.
4. Apply a non-hardening sealant (Meritor part
number A-2297-F-4114 or equivalent) to the
first three threads on the chamber.
5. Check that the collet nut does not prevent you
from tightening the chamber completely into
the plunger housing. Tighten the chamber
completely into the plunger housing. Then
loosen the chamber no more than one turn to
align and connect the air lines to the ports.
Figure 4.8
RETAINER
ROLLER
BOOT
SPRING
COTTER
PIN
WEDGE
WEDGE
ANGLE
STAMPED
HERE
WASHER
ROLLER
ROLLER
CAGE
Figure 4.9
WEDGE SEAT
SLOT
SLOT
Back to Top

