TB-9-2320-335-13-P - Page 400 of 680
24-16
TB 9-2320-335-13&P
24-15.1. FRONT DIFFERENTIAL SUPPORT BRACKET/BRAKE ADAPTER REPLACEMENT
(SERIAL NUMBERS 300000 AND ABOVE)
This task covers:
a. Removal
b.
Installation
INITIAL SETUP:
Tools
General mechanic’s tool kit:
automotive (Appendix B, Item 1)
Maintenance and repair shop equipment:
automotive (Appendix B, Item 2)
Materials/Parts
O-ring (Appendix A, Item 215)
Locknut (Appendix A, Item 85)
Locknut (Appendix A, Item 114.4)
Sealing compound (Appendix C, Item 63)
Manual References
TM 9-2320-387-24P
Equipment Condition
Service brake rotors removed (para. 7-12.1).
General Safety Instructions
Differential is extremely heavy and must be
supported during removal and installation.
Maintenance Level
Direct support
WARNING
Differential is extremely heavy and must be supported during
removal and installation. Failure to do so may result in injury to
personnel or damage to equipment.
NOTE
Replacement procedures for all differential support brackets/brake
adapters are basically the same. This procedure covers the left
front differential support bracket/brake adapter.
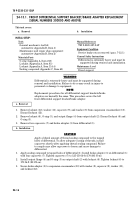
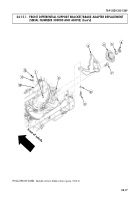
1.
Remove locknut (12), washer (11), capscrew (9), and washer (8) from suspension crossmember (10).
Discard locknut (12).
2.
Remove locknut (6), O-ring (5), and output flange (4) from output shaft (2). Discard locknut (6) and
O-ring (5).
3.
Remove four capscrews (7) and brake adapter (3) from differential (1).
CAUTION
Apply a liberal amount of thread sealing compound to the tapped
holes of differential. To allow adequate coating of threads, install
capscrews shortly after applying thread sealing compound. Failure
to comply may allow capscrews to loosen and cause damage to
differential.
1.
Apply sealing compound to tapped holes of differential (1). Install brake adapter (3) on differential (1)
with four capscrews (7). Tighten capscrews (7) to 125-150 lb-ft (170-203 N
•
m).
2.
Install output flange (4) and O-ring (5) on output shaft (2) with locknut (6). Tighten locknut (6) to
170 lb-ft (231 N
•
m).
3.
Secure brake adapter (3) to suspension crossmember (10) with washer (8), capscrew (9), washer (11),
and locknut (12).
b. Installation
a. Removal
Back to Top

