TB-9-2320-335-13-P - Page 410 of 680
TB 9-2320-335-13&P
24-18.1. REAR SUSPENSION FRONT CROSSMEMBER REPLACEMENT
(SERIAL NUMBERS 300000 AND ABOVE)
This task covers:
a. Removal
b. Installation
INITIAL SETUP:
Tools
General mechanic’s tool kit:
automotive (Appendix B, Item 1)
Maintenance and repair shop equipment:
automotive (Appendix B, Item 2)
Materials/Parts
Seven locknuts (Appendix A, Item 88)
Three locknuts (Appendix A, Item 114.4)
Manual References
TM 9-2320-387-24-1
TM 9-2320-387-24P
Equipment Condition
• Rear differential removed (para. 21-4.2).
• Rear differential support brackets and side
mounting brackets removed (para. 24-15.2).
Equipment Condition (Cont’d)
•Rear upper control arms removed
(TM 9-2320-387-24-1).
•Rear lower control arms removed
(TM 9-2320-387-24-1).
•Rear-front tiedown brackets installed
(para. 24-14).
•Rear brake protection guards removed
(para. 7-11.1).
General Safety Instructions
Crossmember must be supported during removal
and installation.
Maintenance Level
Direct support
WARNING
Crossmember must be supported during removal and installation.
Failure to do so may cause injury to personnel or damage to
equipment.
NOTE
Replacement procedures for left and right assemblies are basically
the same. This procedure covers the right side assembly.
1.
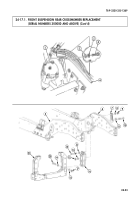
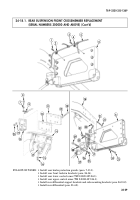
Remove two capscrews (1) and (3), clamps (2) and (4), and vent line (5) from crossmember (6).
2.
Remove two locknuts (16), washers (15), capscrews (8), washers (7), and vent line bracket (9) from
crossmember mount (17). Discard locknuts (16).
3.
Remove four locknuts (20), washers (19), capscrews (13), washers (12), tiedown bracket (18), and
reinforcement plates (10) and (11) from frame (14). Discard locknuts (20).
4.
Remove locknut (25), washer (26), capscrew (29), washer (28), and radius rod (27) from crossmember
mount (17). Discard locknut (25).
5.
Slide crossmember mount (17) and crossmember (6) down and out from vehicle.
6.
Remove locknut (33), washer (32), capscrew (22), and washer (21) from crossmember (6). Discard
locknut (33).
7.
Remove two locknuts (31), washers (30), capscrews (23), washers (24), and crossmember mount (17)
from crossmember (6). Discard locknuts (31).
a. Removal
24-26
Back to Top

