TB-9-2920-225-34-1 - Page 52 of 70
TB 9-2920-225-34-1
Section V. LEECE-NEVILLE MODEL R0015027RD
3-10. General.
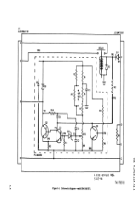
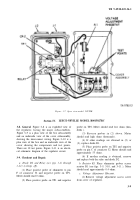
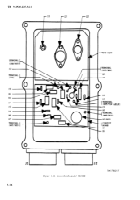
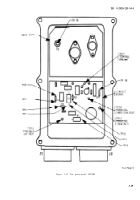
Figure 3–12 is a plan view of the
regulator with the cover removed, showing the
heat sink and the circuit board. The components
are indicated by their reference designations, and
on the circuit board the terminals are associated
wire colors are also indicated. Figure 3–13 is a
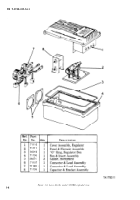
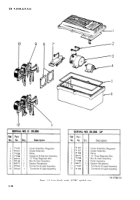
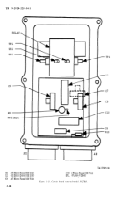
plan view of the regulator with the cover, heat
sink and circuit board removed, showing the relay
and remaining components. The components are
indicated by their reference designations, and test
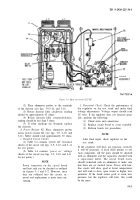
points 1 through 5 are shown. Figure 3-14 is a
plan view of the regulator with the cover removed,
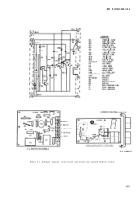
showing test points 6 through 18. There are 18
total test points. Figure 3-15 is an electrical sche-
matic diagram of the regulator circuit.
3-11. Checkout and Repair.
a. Relay (see Figs. 3–13 and 3–14) (power dis-
connected).
(1) Place positive probe of ohmmeter on pin
F of connector J2 and negative probe on TP1
(white/yellow wire). Meter should read low ohms
(hundreds).
(2) Reverse probes. Meter should read high
ohms (thousands).
(3) If other readings are obtained, see de-
tailed circuit check below.
(4) Place ohmmeter positive probe on TP2
and negative probe on TP1. Meter should read
approximately 50 ohms.
(5) Reverse probes. Meter should read low
ohms (more than 10 and less than 100).
(6) If other readings are obtained, discon-
nect the WHT/YLW wire on TP1 and repeat (4)
and (5) looking for a meter reading of 40 to 60
ohms in each case. If other readings are obtained
replace the relay, NSN 5945–00-409-3883. Re-
place the WHT/YLW wire on TP1.
(7) Place ohmmeter probes on TP3 and TP4.
Meter should read infinity (open circuit). If other
readings are obtained replace the relay, NSN
(8) Place positive ohmmeter probe on TP17
and negative probe on TP8. The reading should
be greater than 10 ohms and less than 100 ohms;
if not replace Ql, NSN 5961–00–730–3284.
(9) Place positive ohmmeter probe on TP12
and negative probe on TP13. Rotate the potenti-
ometer. Full counterclockwise should be 0 ohms,
gradually increasing to 100 ohms at full clockwide.
If not, replace the potentiometer. The potenti-
ometer is a 100 ohm, 2 watt, tab-mounted device.
Failed devices have been successfully replaced
with part number 71590–WT-100 by performing
some minor mechanical modification.
Globe-Union Inc. FSCM 71590
Centralab Electronics Div.
Hwy. 20 W. P.O. Box 858
Fort Dodge, IA 50501
(10) Place positive ohmmeter probe on TP15
and negative probe on TP16. The reading should
be greater than 10 ohms and less than 100 ohms;
if not, replace D3.
b. Resistor R10.
(1) Place ohmmeter probes on pins D and E
of connector J2. Meter should read approximately
0.4 ohms.
(2) If other readings are obtained, replace
resistor.
c. Resistor R9.
(1) Place ohmmeter probes on TP5 and pin
C of connector J2. Meter should read 0 ohms plus
(resistor is actually rated at 0.05 ohms).
(2) If other readings are obtained, check the
wiring from the bottom terminal of the resistor
to pin C on connector J2. If the wire continuity is
good, replace the resistor.
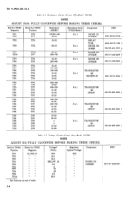
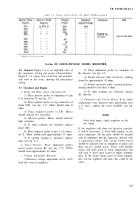
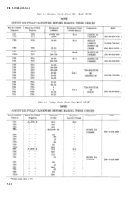
d. Detailed Circuit Checks.
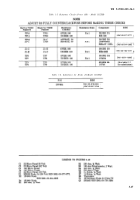
Table 3–5 contains
“power off” resistance checks of the circuit (see
figs. 3–12, 3-14 and 3-15 for test points).
e. Functional Check.
Check the performance of
the regulator on the test stand and make final volt-
age adjustments. Voltage output should read 28
volts. If
perform
(1)
(2)
(3)
the regulator does not function properly,
the following:
Check wires and connections.
Replace cover assembly.
Perform bench test procedures.
NOTE
After final repair, check regulator on the
test stand.
If the regulator still noes not function correctly
it will be necessary, if local skills permit, to test
each component. All the parts should be checked
with an ohmmeter and the capacitors checked with
a capacitance meter. The circuit board traces
should be checked with an ohmmeter to ensure
that there are no cracked traces. Traces with
hairline cracks will show as good at lower tem-
peratures and will tend to show open circuit at
higher temperatures. If the board seems good at
room temperature, but the regulator still fails,
this could be the cause.
3-15
Back to Top

