TM-1-1500-344-23-2 - Page 64 of 240
3-4
NAVAIR 01-1A-509-2
TM 1-1500-344-23-2
15 April 2009
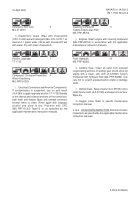
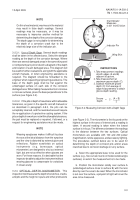
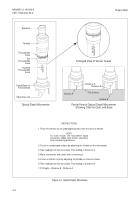
Figure 3-3. Optical Depth Micrometer
Partial View of Optical Depth Micrometer
Showing Only the Optic and Base
Optical Depth Micrometer
2468
3579
10
Enlarged View of Vernier Scales
Distance A
Surface A
Flat Surface
Surface B
Distance B
INSTRUCTIONS
1. Place micrometer on an undamaged surface near the area of interest.
2. Focus on undamaged surface by adjusting the thimble on the micrometer.
3. Take reading from Vernier scales. This reading is Distance A.
4. Move micrometer and center over corrosion pit.
5. Focus on bottom of pit by adjusting the thimble on the micrometer.
6. Take reading from Vernier scales. This reading is Distance B.
7. Pit Depth = Distance B - Distance A
NOTE
For best results, the micrometer tripod
should be stable and remain stationary
when measuring distances.
2468
3579
10
Thimble
Eyepiece
Thousandths
Scale
Ten
Thousandths
Scale
Hundred
Thousandths
Scale
Tripod Base for
Flat Surfaces
Objective Lens
Back to Top


