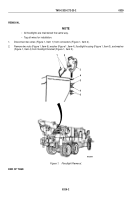
TM-9-2320-272-23-2 - Page 1296 of 1417
ASSEMBLY
1.
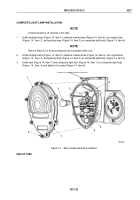
Install two grommets (Figure 4, Item 11) and spacers (Figure 4, Item 12) on floodlight housing
(Figure 4, Item 3).
2.
Install stud (Figure 4, Item 7) on mounting bracket (Figure 4, Item 9) with pin (Figure 4, Item 8).
3.
Install floodlight housing (Figure 4, Item 3) and two washers (Figure 4, Item 4) on mounting bracket
(Figure 4, Item 9) with four spring washers (Figure 4, Item 6), two washers (Figure 4, Item 4), and screws
(Figure 4, Item 5).
4.
Install two washers (Figure 4, Item 2), lockwashers (Figure 4, Item 10), and nuts (Figure 4, Item 1) on floodlight
housing (Figure 3, Item 3) and screws (Figure 3, Item 5).
5.
Install switch housing (Figure 4, Item 16) on floodlight housing (Figure 4, Item 3) with two lockwashers
(Figure 4, Item 17) and screws (Figure 4, Item 18).
6.
Install pressure switch (Figure 4, Item 15) on floodlight housing (Figure 4, Item 3) with retainer
(Figure 4, Item 14) and two screws (Figure 4, Item 13).
13
14
15
16
3
12
11
3
8
9
10
1
2
3
4
5
6
7
17
18
M10021DAA
Figure 4.
Floodlight Assembly.
TM 9-2320-272-23-2
0329
0329-5
Back to Top

