TM-9-2320-272-23-3 - Page 342 of 1469
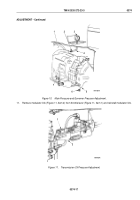
REMOVAL - Continued
2.
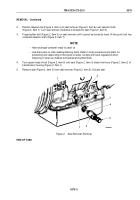
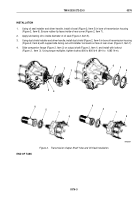
Position tapered end (Figure 2, Item 4) of seal remover (Figure 2, Item 6) over selector shaft
(Figure 2, Item 7). Turn seal remover clockwise to thread into seal (Figure 2, Item 3).
3.
Finger-tighten bolt (Figure 2, Item 5) on seal remover until it cannot be turned by hand. At this point, bolt has
contacted selector shaft (Figure 2, Item 7).
NOTE
•
Have drainage container ready to catch oil.
•
Use drain pans to retain leaking/draining fluids. Refer to local procedures and plans for
preventing and responding to fluid spills or leaks. Comply with local regulations when
disposing of clean up material and leaked and spilled fluids.
4.
Turn square head of bolt (Figure 2, Item 5) until seal (Figure 2, Item 3) slides from bore (Figure 2, Item 2) of
transmission housing (Figure 2, Item 1).
5.
Remove seal (Figure 2, Item 3) from seal remover (Figure 2, Item 6). Discard seal.
3
4
5
2
1
6
7
M7028DAA
Figure 2.
Seal Remover Removal.
END OF TASK
TM 9-2320-272-23-3
0375
0375-3
Back to Top

