TM-9-2320-272-23-3 - Page 373 of 1469
OIL COOLER REMOVAL
CAUTION
•
Clean area around hoses before removal to prevent entry of dirt. Damage may occur if
dirt or dust enters transmission.
•
Cover or plug all open hoses and connections immediately after disconnection to prevent
contamination. Failure to do this may result in transmission damage.
NOTE
•
Have drainage container ready to catch oil and coolant.
•
Tag hoses for installation.
•
Use drain pans to retain leaking/draining fluids. Refer to local procedures and plans for
preventing and responding to fluid spills or leaks. Comply with local regulations when
disposing of clean up material and leaked and spilled fluids.
1.
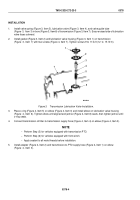
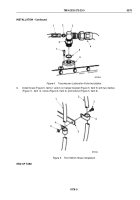
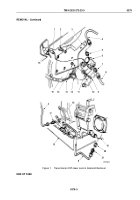
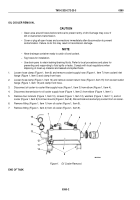
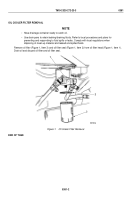
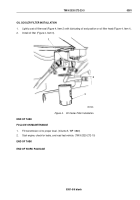
Loosen hose clamp (Figure 1, Item 6) and remove coolant supply hose (Figure 1, Item 7) from coolant inlet
flange (Figure 1, Item 5) and clamp from hose.
2.
Loosen hose clamp (Figure 1, Item 14) and remove coolant return hose (Figure1, Item 15) from coolant outlet
flange (Figure 1, Item 13) and clamp from hose.
3.
Disconnect oil cooler-to-cooler filter supply hose (Figure 1, Item 3) from elbow (Figure 1, Item 4).
4.
Disconnect transmission-to-oil cooler supply hose (Figure 1, Item 2) from elbow (Figure 1, Item 1).
5.
Remove four locknuts (Figure 1, Item 10), screws (Figure 1, Item 12), washers (Figure 1, Item 11), and oil
cooler (Figure 1, Item 9) from two mounts (Figure1, Item 8). Discard locknuts and empty coolant from oil cooler.
6.
Remove fitting (Figure 1, Item 1) from oil cooler (Figure 1, Item 9).
7.
Remove fitting (Figure 1, Item 4) from oil cooler (Figure 1, Item 9).
15
14
13
12
11
10
9
8
6
5
4
3
2
1
7
M8074DAA
Figure 1.
Oil Cooler Removal.
END OF TASK
TM 9-2320-272-23-3
0380
0380-2
Back to Top

