TM-9-2320-272-23-4 - Page 180 of 1393
INSTALLATION - Continued
3.
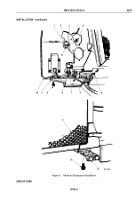
Install windshield hinge (Figure 4, Item 5) on windshield frame assembly (Figure 4, Item 6) with seven screws
(Figure 4, Item 4).
4.
Install lock handle (Figure 4, Item 9) on windshield frame assembly (Figure 4, Item 6) with two screws
(Figure
4,
Item
10), lockwashers (Figure 4, Item 7), and capnuts (Figure 4, Item 8).
5.
Install two friction lockarms (Figure 4, Item 11) on windshield outer frame (Figure 4, Item 6) with two spring
washers (Figure 4, Item 14) and screws (Figure 4, Item 12).
6.
Install windshield hinge (Figure 4, Item 5) on windshield frame (Figure 4, Item 2) with eight screw assembled
washers (Figure 4, Item 1).
7.
Close and lock windshield frame assembly (Figure 4, Item 6).
3
4
5
M5132DAA
1
2
6
7
8
9
10
11
12
13
14
15
Figure 4.
Windshield Frame Installation.
END OF TASK
FOLLOW-ON MAINTENANCE
1.
Install windshield. (WP
0577)
2.
Install windshield wiper blade, wiper arm, and wiper motor. (WP
0736)
END OF TASK
END OF WORK PACKAGE
TM 9-2320-272-23-4
0578
0578-5/6 blank
Back to Top


