TM-9-2320-272-23-4 - Page 418 of 1393
FIELD MAINTENANCE
VAN SIDE AND REAR DOOR BLACKOUT LIGHT SWITCH REPLACEMENT
INITIAL SETUP:
Tools and Special Tools
Tool Kit, General Mechanic's: Automotive
(Volume 5, WP
0826, Table 1, Item 56)
Materials/Parts
Solder, Tin Alloy
(Volume 5, WP
0825, Table 1, Item 64)
Equipment Condition
Parking brake set. (TM 9-2320-272-10)
Equipment Condition (cont.)
Main power switch OFF. (TM 9-2320-272-10)
Van side panel fully expanded and secured.
(TM
9-2320-272-10)
REMOVAL
1.
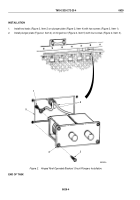
Remove two screws (Figure 1, Item 3) and blackout light switch (Figure 1, Item 2) from electrical panel
(Figure
1,
Item
7) or switch box (Figure 1, Item 1).
2.
Remove solder from terminals of blackout light switch (Figure 1, Item 2) and disconnect two wires
(Figure
1,
Item
6).
3.
Remove nut (Figure 1, Item 4) and plate (Figure 1, Item 5) from blackout light switch (Figure 1, Item 2).
3
4
M9922DAA
1
2
5
6
7
2
3
4
5
6
Figure 1.
Side and Rear Door Blackout Light Switch Removal.
END OF TASK
TM 9-2320-272-23-4
0628
0628-1
Back to Top


