TM-9-2320-272-23-4 - Page 439 of 1393
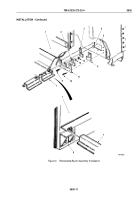
INSTALLATION - Continued
CAUTION
Do not bend or strain ratchet shaft during installation. Doing so may result in damage
to
equipment.
NOTE
•
Bevel forward end of ratchet shaft for installation.
•
Apply GAA grease on two feet (61 cm) of forward end of ratchet shaft for installation.
•
Direct assistant to install ratchet shaft components under van body when installing ratchet
shaft.
4.
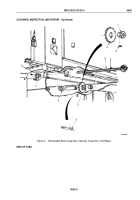
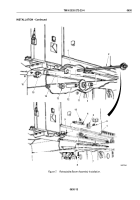
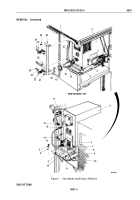
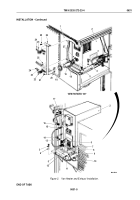
Slowly insert ratchet shaft (Figure 7, Item 2) into underframe (Figure 7, Item 1) and install five spacers
(Figure
7,
Item
3), sprockets (Figure 7, Item 11), spacers (Figure 7, Item 12), nine bushings
(Figure
7,
Item
13), and four bushings (Figure 7, Item 15).
5.
Install four setscrews (Figure 7, Item 16) in bushings (Figure 7, Item 15) in underframe channels
(Figure
7,
Item
14).
6.
Lubricate ratchet shaft (Figure 7, Item 2) with GAA grease (TM 9-2320-272-10).
7.
Install five covers (Figure 7, Item 7) on underframe (Figure 7, Item 1) with 30 screws (Figure 7, Item 8).
8.
Install lock (Figure 7, Item 4) and pawl (Figure 7, Item 5) on underframe stud (Figure 7, Item 9) and underframe
(Figure 7, Item 1) with locknut (Figure 7, Item 10) and screw (Figure 7, Item 6).
TM 9-2320-272-23-4
0630
0630-12
Back to Top

