TM-9-2320-272-23-4 - Page 507 of 1393
DISASSEMBLY
1.
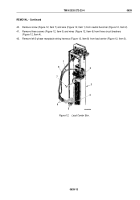
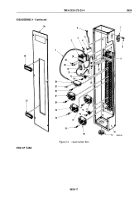
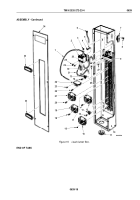
Remove six plates (Figure 14, Item 33) from load center cover (Figure 14, Item 34).
2.
Remove two screws (Figure 14, Item 29), jumper wire (Figure 14, Item 30), and ground B cable
(Figure
14,
Item
32) from relay (Figure 14, Item 2).
3.
Remove screws (Figure 14, Items 25 and 28) and ground N cable (Figure 14, Item 31) from relay
(Figure 14, Item 2) and neutral buss bar (Figure 14, Item 9).
4.
Remove screw (Figure 14, Item 26) and ground B cable (Figure 14, Item 32) from neutral buss bar
(Figure 14, Item 9).
5.
Remove screws (Figure 14, Items 3 and 23) and relay cable (Figure 14, Item 1) from 20-amp circuit breaker
(Figure 14, Item 24) and relay (Figure 14, Item 2).
6.
Remove three screws (Figure 14, Item 4), lockwashers (Figure 14, Item 5), and relay (Figure 14, Item 2) from
load center box (Figure 14, Item 10). Discard lockwashers.
7.
Remove screw (Figure 14, Item 19) and cable (Figure 14, Item 6) from neutral buss bar (Figure 14, Item 9).
8.
Remove six screws (Figure 14, Item 25) and insulators (Figure 14, Item 13) from load center
(Figure
14,
Item
10).
9.
Remove nine screws (Figure 14, Item 22) and nine 20-amp circuit breakers (Figure 14, Item 24) from load
center (Figure 14, Item 10).
10.
Remove three screws (Figure 14, Item 20) and 30-amp circuit breaker (Figure 14, Item 21) from load center
(Figure 14, Item 10).
11.
Remove three screws (Figure 14, Item 18) and 40-amp circuit breaker (Figure 14, Item 19) from load center
(Figure 14, Item 10).
12.
Remove 12 screws (Figure 14, Item 17) and four 20-amp circuit breakers (Figure 14, Item 12) from load center
(Figure 14, Item 10).
13.
Remove three screws (Figure 14, Item 16) and 100-amp circuit breaker (Figure 14, Item 15) from load center
(Figure 14, Item 10).
14.
Remove grommet (Figure 14, Item 11) from load center (Figure 14, Item 10).
15.
Remove two screws (Figure 14, Item 8) and blackout door switch (Figure 14, Item 7) from load center
(Figure
14,
Item
10).
TM 9-2320-272-23-4
0639
0639-16
Back to Top

