TM-9-2320-272-23-4 - Page 941 of 1393
REMOVAL
CAUTION
When disconnecting hydraulic lines and hoses, plug all openings to prevent dirt from entering
and causing internal damage to parts.
NOTE
•
Have drainage container ready to catch oil.
•
Use drain pans to retain leaking/draining fluids. Refer to local procedures and plans for
preventing and responding to fluid spills or leaks. Comply with local regulations when
disposing of clean up material and leaked and spilled fluids.
•
Tag lines and hoses for installation.
1.
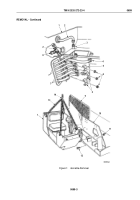
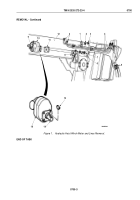
Disconnect two steel hydraulic lines (Figure 1, Item 4) from elbows (Figure 1, Item 9).
2.
Disconnect two hydraulic flex hoses (Figure 1, Item 5) from steel hydraulic lines (Figure 1, Item 4).
3.
Remove four locknuts (Figure 1, Item 3), washers (Figure 1, Item 2), clamps (Figure 1, Item 1), and two steel
hydraulic lines (Figure 1, Item 4) from boom (Figure 1, Item 12). Discard locknuts.
4.
Remove four screws (Figure 1, Item 7), lockwashers (Figure 1, Item 6), hoist motor (Figure 1, Item 10), and
gasket (Figure 1, Item 11) from winch gearbox adapter (Figure 1, Item 8). Discard lockwashers and gasket.
Clean gasket remains from mating surface.
5.
Remove woodruff key (Figure 1, Item 13) from gear shaft (Figure 1, Item 14).
TM 9-2320-272-23-4
0700
0700-2
Back to Top

