TM-9-2320-272-23-5 - Page 321 of 623
INSTALLATION - Continued
10.
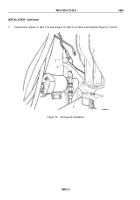
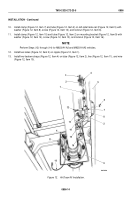
Install clamp (Figure 12, Item 7) and tube (Figure 12, Item 2) on left-side frame rail (Figure 12, Item 5) with
washer (Figure 12, Item 8), screw (Figure 12, Item 12), and locknut (Figure 12, Item 6).
11.
Install clamp (Figure 12, Item 15) and tube (Figure 12, Item 2) on mounting bracket (Figure 12, Item 9) with
washer (Figure 12, Item 14), screw (Figure 12, Item 13), and locknut (Figure 12, Item 16).
NOTE
Perform Steps (12) through (14) for M923/A1/A2 and M925/A1/A2 vehicles.
12.
Install two tubes (Figure 12, Item 2) on nipple (Figure 12, Item 1).
13.
Install two tiedown straps (Figure 12, Item 4) on tube (Figure 12, Item 2), line (Figure 12, Item 11), and wire
(Figure 12, Item 10).
M9079DAA
1
12
13
14
4
11
15
16
10
9
2
8
7
6
5
4
2
3
Figure 12.
Air Dryer Kit Installation.
TM 9-2320-272-23-5
0806
0806-14
Back to Top


