TM-9-2320-273-34 - Page 611 of 801
TM9-2320-273-34
16-7. Disassembly.
a.
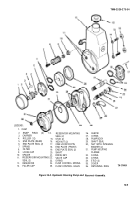
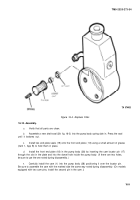
Remove all dirt and oil from the external surfaces of the pump assembly.
b.
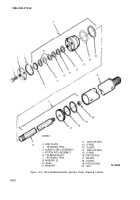
Remove filler cap (13, fig. 16-3) from the reservoir (12) and drain the balance of the oil
from the reservoir.
Do not clamp on the pump or reservoir
as they are easily damaged by a vise.
c.
Clamp the pump mounting flange (31) into a vise.
d.
Remove the two nuts ( 16) and reservoir mounting seals ( 14) from studs ( 15) on the backside
of the reservoir ( 12).
Do not pry on the edge of the
with any tool.
reservoir
Once the reservoir has been loosened, it
must be removed and a new O-ring (33)
installed.
e.
Note the position of the reservoir on the case pump for later reassembly.
f
Carefully remove the reservoir from the pump body (28) by gently tapping the side of the
reservoir with a rubber mallet.
9.
h.
i.
i
k.
l.
Remove reservoir mounting seals (11 ).
Loosen, but do not remove, the retaining ring (36) using a spanner wrench.
Remove the elbow (26) and O-ring (27) from the pump body (28).
Remove the flow control valve cap (22), spring (24), and valve (25).
Remove O-ring (23) from valve cap (22).
Remove the pump from the vise for further disassembly on a repair bench.
16-6
CAUTION
CAUTIO N
Back to Top

