TM-9-2320-273-34 - Page 612 of 801
TM9-2320-273-34
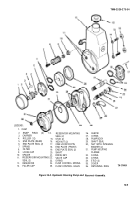
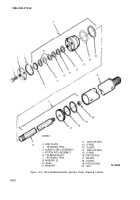
Remove the two mounting flange nuts with integral washers (30) and remove the pump
mounting flange (31). Remove O-ring (32).
n.
Remove the retaining ring (36), Note which side is marked up.
o.
Remove the cover (35) by lightly tapping the front end of the pump shaft (20).
P.
Remove the rear end plate (5).
NOTE
The end plates (5) and (18) are not
identical and should be marked for
later reassembly.
q.
Remove the pump shaft (20), carrier (3), and the 12 loose rollers (4).
Sharp corners on the cam ring can cut
your fingers.
NOTE
The up side of the cam must be marked
for reassembly.
r.
Remove the cam (1) using a clean rag to hold it with.
s.
Remove the cam locator pin (17) and the front end plate (18). If the dump body has two
holes for the locator pin, note which one is used, for later reassembly.
t.
Remove end plate seals (6) and (19). Discard seals.
u.
Remove the large O-ring (33) from the pump body.
v.
Remove the shaft seal (29).
w.
Refer to para 16-9j for maintenance of spring (7), filter (8), loose cup (9), and spacer (10).
16-8. Cleaning.
Clean all metal parts in SD-2 solvent and air dry.
16-9. Inspection and Repair.
Inspect each component for excessive wear as follows:
a. Body and Bushing Assemb/y. Inspect
the shaft bushing for excessive burning, scoring, or oversize
condition. If any of these conditions exist, replace the body and bushing as an assembly. If the ball plug
near the valve cap threads has blown out, the ball must be driven back into the drilled angle hole to a depth
of 1/4 in. below the cast surface.
16-7
m .
WARNING
Back to Top

