TM-9-2320-280-20-2 - Page 414 of 951
TM 9-2320-280-20-2
4-176
Change 3
4-96. CONTROL BOX ASSEMBLY REPLACEMENT (M997, M997A1, M997A2)
This task covers:
a. Removal
b. Installation
INITIAL SETUP:
1.
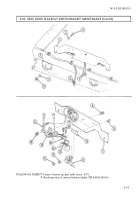
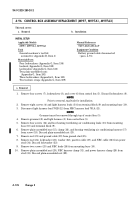
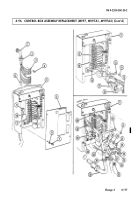
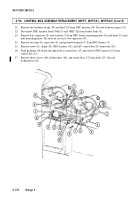
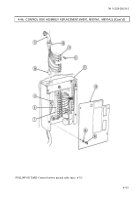
Remove four screws (7), lockwashers (8), and cover (6) from control box (5). Discard lockwashers (8).
NOTE
Prior to removal, tag leads for installation.
2.
Remove eight screws (4) and light harness leads (3) from terminal block (9) and mounting buss (10).
3.
Disconnect light harness lead 791B (12) from NBC harness lead 791A (11).
NOTE
Grommet must be removed through top of control box (5).
4.
Remove grommet (2) and light harness (1) from control box (5).
5.
Remove four screws (14) and four heating ventilating air conditioning leads (13) from mounting
buss (10) and terminal block (9).
6.
Remove plain-assembled nut (15), clamp (16), and heating ventilating air conditioning harness (17)
from screw (18). Discard plain-assembled nut (15).
7.
Remove nut (21) and ground cable (19) from ground stud (35).
8.
Remove nut (24), lockwasher (23), washer (22), positive cable (27), and NBC cable (32) from power
stud (34). Discard lockwasher (23).
9.
Remove two screws (25) and NBC leads (26) from mounting buss (10).
10.
Remove plain-assembled nut (29), NBC harness clamp (31), and power harness clamp (28) from
stud (33). Discard plain-assembled nut (29).
a. Removal
Applicable Models
M997, M997A1, M997A2
Tools
General mechanic’s tool kit:
automotive (Appendix B, Item 1)
Materials/Parts
Four lockwashers (Appendix G, Item 136)
Locknut (Appendix G, Item 128)
Lockwasher (Appendix G, Item 133)
Two plain-assembled nuts
(Appendix G, Item 201)
Three lockwashers (Appendix G, Item 135)
Two tiedown straps (Appendix G, Item 309)
Manual References
TM 9-2320-280-24P
Equipment Condition
Battery ground cable disconnected
(para. 4-73).
Back to Top

