TM-9-2320-280-20-2 - Page 779 of 951
TM 9-2320-280-20-2
7-64
Change 3
7-26. REAR DUAL SERVICE/PARKING BRAKE ADJUSTMENT
This task covers:
Adjustment
Manual References
TM 9-2320-280-10
TM 9-2320-280-24P
Equipment Condition
Wheels chocked and parking brake released
(TM 9-2320-280-10).
Adjustment
1.
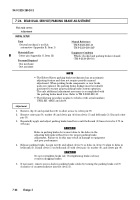
Remove clip (1) and spread boot (2) to allow access to cotter pin (9).
2.
Remove cotter pin (9), washer (8) and clevis pin (4) from clevis (5) and bellcrank (3). Discard cotter
pin (9).
3.
Repeatedly apply and adjust parking brake hand lever until bellcrank (3) linear travel is 0.75 in.
(19 mm).
4.
Release parking brake. Loosen nut (6) and adjust clevis (5) so holes in clevis (5) align to holes in
bellcrank (3). Install clevis (5) on bellcrank (3) with clevis pin (4), washer (8), and cotter pin (9).
5.
If necessary, remove excess slack in parking brake cables by turning the parking brake rod (7)
clockwise or counterclockwise into the clevis (5).
NOTE
• The Kelsey-Hayes parking brake mechanism has an automatic
adjusting feature and does not require periodic manual
adjustment. When parking brake components or rear brake
pads are replaced, the parking brake linkage must be initially
positioned to ensure proper parking brake system operation.
The only additional adjustment necessary is accomplished with
the parking brake hand lever. Refer to TM 9-2320-280-10.
• The following procedure applies to vehicles with serial numbers
USBL Eff. 44825 and above.
CAUTION
Holes in parking brake clevis must aline to the holes in the
adjusting bellcrank without force for proper parking brake
adjustment. Failure to do this may result in damage to equipment
and poor performance.
CAUTION
Do not overtighten brake rod. Overtightening brake rod may
result in dragging brakes.
INITIAL SETUP:
Tools
General mechanic’s tool kit:
automotive (Appendix B, Item 1)
Materials/Parts
Cotter pin (Appendix G, Item 12)
Personnel Required
One mechanic
One assistant
Back to Top


