TM-9-2320-283-13-P - Page 200 of 400
TM 9-2320-283-13&P
0025
0025-2
1
2
3
4
5
1
2
3
4
5
6
7
8
1
2
3
4
5
6
7
8
9
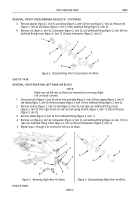
REMOVAL, FRONT CROSSMEMBER AIR BLOCK - CONTINUED
3.
Remove adapter (figure 2, item 5) and elbow (figure 2, item 6) from tee (figure 2, item 4). Remove tee
(figure 2, item 4) and elbow (figure 2, item 1) from bulkhead fitting (figure 2, item 8).
4.
Remove nut (figure 2, item 3), lockwasher (figure 2, item 2), and bulkhead fitting (figure 2, item 8) from
bulkhead fitting mount (figure 2, item 7). Discard lockwasher (figure 2, item 2).
Figure 2. Disassembling Front Crossmember Air Block.
END OF TASK
REMOVAL, RIGHT-REAR AND LEFT-REAR AIR BLOCK
NOTE
Right-rear and left-rear air blocks are removed the same way. Right-
rear air block is shown.
1.
Disconnect tube (figure 3, item 8) and air hose assembly (figure 3, item 5) from adapter (figure 3, item 7)
and elbow (figure 3, item 4). Remove adapter (figure 3, item 7) from bulkhead fitting (figure 3, item 6).
2.
Remove locknut (figure 3, item 2), bolt (figure 3, item 9), and right-rear bulkhead fitting mount
(figure 3, item 3) from right frame rail and rear leaf spring shackle (figure 3, item 1). Discard locknut
(figure 3, item 2).
3.
Remove elbow (figure 4, item 3) from bulkhead fitting (figure 4, item 1).
4
Remove nut (figure 4, item 4), lockwasher (figure 4, item 2), and bulkhead fitting (figure 4, item 1) from
right-rear bulkhead fitting mount (figure 4, item 5). Discard lockwasher (figure 4, item 2).
5
Repeat steps 1 through 4 for removal of left-rear air block.
Figure 3. Removing Right-Rear Air Block.
Figure 4. Disassembling Right-Rear Air Block.
END OF TASK
Back to Top

