TM-9-2330-342-23-P - Page 1035 of 1348
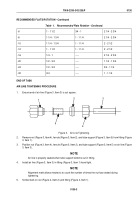
RECOMMENDED FLATS ROTATION - Continued
Table
1.
Recommended Flats Rotation - Continued.
-6
1 - 1 1/2
3/4 - 1
2 1/4 - 2 3/4
-8
1 1/4 - 1 3/4
1 - 1 1/4
2 1/4 - 2 3/4
-10
1 1/4 - 1 3/4
1 - 1 1/4
2 - 2 1/2
-12
1 - 1 1/2
1 - 1 1/4
2 - 2 1/2
-16
1/4 - 1
-----
2 1/4 - 2 3/4
-20
1/2 - 3/4
-----
1 1/4 - 1 3/4
-24
1/2 - 3/4
-----
3/4 - 1 1/4
-32
3/4
-----
1 - 1 1/4
END OF TASK
AIR LINE TIGHTENING PROCEDURE
1.
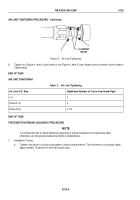
Ensure end of air line (Figure 3, Item 3) is cut square.
1
2
3
4
5
Figure 3.
Air Line Tightening.
2.
Remove nut (Figure 3, Item 4), ferrule (Figure 3, Item 2), and tube support (Figure 3, Item 5) from fitting (Figure
3, Item 1).
3.
Position nut (Figure 3, Item 4), ferrule (Figure 3, Item 2), and tube support (Figure 3, Item 5) on air line (Figure
3, Item 3).
NOTE
Air line is properly seated when tube support bottoms out in fitting.
4.
Install air line (Figure 3, Item 3) in fitting (Figure 3, Item 1) hand tight.
NOTE
Alignment mark allows mechanic to count the number of times the nut has rotated during
tightening.
5.
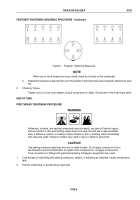
Scribe mark on nut (Figure 4, Item 2) and fitting (Figure 4, Item 1).
TM 9-2330-342-23&P
0130
0130-3
Back to Top

