TM-9-2330-342-23-P - Page 1036 of 1348
AIR LINE TIGHTENING PROCEDURE - Continued
2
1
ALIGNMENT
MARKS
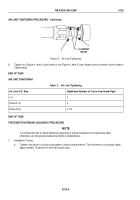
Figure 4.
Air Line Tightening.
6.
Tighten nut (Figure 4, Item 2) until mark on nut (Figure 4, Item 2) has rotated correct number of turns (refer to
Table below).
END OF TASK
AIR LINE TIGHTENING
Table
2.
Air Line Tightening.
Air Line O.D. Size
Additional Number of Turns from Hand-Tight
1/4
3
3/8 and 1/2
4
5/8 and 3/4
3 1/2
END OF TASK
FASTENER TIGHTENING SEQUENCE PROCEDURE
NOTE
If a component has a critical tightening sequence it will be illustrated in that particular task;
otherwise, use the general sequence charts provided below.
1.
Installation Torque.
a.
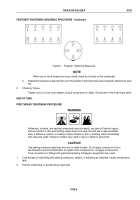
Tighten nuts twice in a criss-cross pattern using a torque wrench. The first time nut is torqued, apply
approximately 75 percent of the final torque value.
TM 9-2330-342-23&P
0130
0130-4
Back to Top

