TM-9-2330-342-23-P - Page 892 of 1348
INSTALLATION
WARNING
Adhesives, solvents, and sealing compounds can burn easily, can give off harmful vapors,
and are harmful to skin and clothing. Keep away from open flame and use in well-ventilated
area. If adhesive, solvent, or sealing compound gets on skin or clothing, wash immediately
with soap and water. Failure to comply may result in injury or death to personnel.
CAUTION
Use sealing compound sparingly and only on threads. Do not apply sealing compound on
hose connections. Damage to equipment may result.
NOTE
If installing right side load lock air chamber, perform Steps (1) and (2). If installing left side
load lock air chamber, perform Steps (3) and (4).
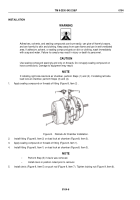
1.
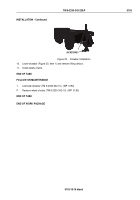
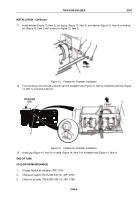
Apply sealing compound on threads of fitting (Figure 8, Item 2) .
2
1
3
Figure 8.
Flatrack Air Chamber Installation.
2.
Install fitting (Figure 8, Item 2) on load lock air chamber (Figure 8, Item 3).
3.
Apply sealing compound on threads of fitting (Figure 8, Item 1).
4.
Install fitting (Figure 8, Item 1) on load lock air chamber (Figure 8, Item 3).
NOTE
•
Perform Step (5) if clevis was removed.
•
Install clevis in position noted prior to removal.
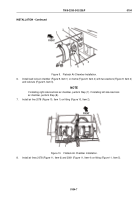
5.
Install clevis (Figure 9, Item 5) on push rod (Figure 9, Item 7). Tighten locking nut (Figure 9, Item 6).
TM 9-2330-342-23&P
0104
0104-6
Back to Top

