TM-9-2330-356-14
SEMITRAILER, TANK: 5000 GALLON, BULK HAUL, SELF LOAD/UNLOAD M967 AND M967A1; SEMITRAILER, TANK: 5000 GALLON, FUEL DISPENSING, AUTOMOTIVE M969 AND M969A1; SEMITRAILER, TANK: 5000 GALLON, FUEL DISPENSING, UNDER/OVERWING AIRCRAFT M970 AND M970A1
TECHNICAL MANUAL; OPERATOR’S, UNIT, DIRECT SUPPORT, AND GENERAL SUPPORT MAINTENANCE MANUAL
OCTOBER 1990
TM-9-2330-356-14 - Page 316 of 528
TM 9-2330-356-14
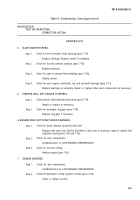
Table 5-4. Troubleshooting - Direct Support (Con‘t).
MALFUNCTION
TEST OR INSPECTION
CORRECTIVE ACTION
ALTERNATOR AND CHARGING CIRCUIT (Con’t)
16. UNDERCHARGED BATTERIES (Con’t).
Step
2.
Step 3.
Step 4.
Step 5.
Step 6.
Step 7.
Check for loose or corroded battery terminals and connections, or bad battery.
Clean and tighten battery connections. Test battery (para 4-23).
Look for worn or glazed pulley or loose belts on alternator drive.
Adjust tension on alternator drive belt (para 4-78). Replace pulley if worn or glazed.
Check for excessive voltage drop between alternator and batteries (para 7-91).
Clean and tighten connections at positive and negative output terminals on alternator
(para 7-91). Also check connections at buss bar assembly and ground (wire No. 3) on
engine (fig. 4-28 or 4-29).
Check engine wiring, especially wire No. 6 (from buss bar to starter solenoid and from buss bar to
engine junction box), for damage (fig. 4-28 or 4-29).
Replace damaged wire.
Check for low setting on voltage regulator (para 7-91).
Adjust voltage regulator.
Check for low alternator output (para 7-91).
Repair or replace alternator.
NOTE
Small current draw (90 milliamps) through field circuit when engine Is not running Is normal.
This is the bleed circuit built Into the voltage regulator.
Step 8.
Test for leaking positive rectifier causing field current draw (2-4 amps) when engine is not running.
Replace diode trio (para 7-79).
Step 9.
Check for faulty voltage regulator (para 7-91).
Replace voltage regulator.
17. OVERCHARGED BATTERIES (Indicated by high water usage).
Step 1.
Check battery case for cracks or damage (para 4-23).
Replace damaged battery.
Step 2.
Check specific gravity or voltage of individual cells (para
Replace defective battery.
4-23).
5-8
Back to Top

