TM-9-2330-356-14
SEMITRAILER, TANK: 5000 GALLON, BULK HAUL, SELF LOAD/UNLOAD M967 AND M967A1; SEMITRAILER, TANK: 5000 GALLON, FUEL DISPENSING, AUTOMOTIVE M969 AND M969A1; SEMITRAILER, TANK: 5000 GALLON, FUEL DISPENSING, UNDER/OVERWING AIRCRAFT M970 AND M970A1
TECHNICAL MANUAL; OPERATOR’S, UNIT, DIRECT SUPPORT, AND GENERAL SUPPORT MAINTENANCE MANUAL
OCTOBER 1990
TM-9-2330-356-14 - Page 325 of 528
TM 9-2330-356-14
WARNING
Release air pressure from both air reservoirs
before doing any work on brake lines or other
pressurized air lines.
(5) Release air from both air reservoirs by
opening drain cocks on bottom of reservoirs (fig. 4-79).
Tag and disconnect the four hoses from brake chambers on
both axles on side which is raised to allow for removal of
the spring assembly.
WARNING
If spring assembly Is seized in spring seat,
jack the rear axle higher to lift the spring. Be
careful not to lift semitrailer off the supports
under the frame.
(6) Remove four nuts and washers from the two
U-bolts. Remove the U-bolts and spring saddle. Loosen
two screws which clamp the spring assembly in the spring
seat. Pry spring assembly from spring seat.
(7) Disconnect upper torque rod (para 5-11)
from rear axle and revolve the axle rearward to allow for
removal of the spring.
(8) Use a lifting device to lift the spring from the
spring guide bracket on the axle, and remove it from the
semitrailer.
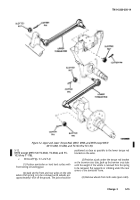
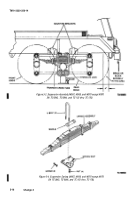
b.
Installation (Figs. 5-3 and 5-4).
(1) Lubricate the spring bearing plate. Insert end
of spring, larger leaf down, into spring guide bracket on
forward rude.
(2) Position spring on spring seat so center, bolt of
spring is over reccess in spring seat. Press or drive the spring
into place. Ensure that the spring center bolt is in the
recess and the spring is firmly seated.
(3) Put the spring saddle in position on the
spring. The nut on the center bolt fits into the recess on
the saddle. Install U-bolts over saddle and through holes
in spring seat. Install four washers and nuts on U-bolts and
tighten evenly to 200-320 lb.-ft. Tighten the two screws
which clamp the spring to the spring seat to 650-750 lb.-ft.
(4)
Using jacks under rear axle, revolve the rude
rearward so end of spring will enter guide bracket on axle.
Release jacks after spring clears the guide bracket.
(5) Connect the upper torque rod to bracket on
rear axle (para 5-11).
(6) Connect four hoses to broke air chambers as
tagged.
(7) Install wheels (pars 4-49).
(8) Remove supports and jacks.
5-13.
Suspension M967A1, M969A1, and
M970A1 including M970 SN TC-0843, TC-0844,
and TC-103 thru TC-178).
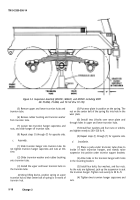
a
Removal
(Fig. 5-5).
(1) Position semitrailer on hard level surface with
front resting on landing gear.
WARNING
Release air pressure from both air reservoirs
before doing any work on brake lines or other
pressurized air lines.
(2) Release air from both air reservoirs by
opening drain cocks on bottom of reservoirs (fig. 4-79).
(3) Loosen wheel lug nuts while wheels are on
ground.
(4) Jack up rear of semitrailer and support under
frame securely until weight of semitrailer is removed from
springs and axles.
(5) Remove wheels from both axles (pars 4-49).
(6) Remove both axles (para 5-15).
(7) Position a jack under the trunnion tube close
to the inside of each trunnion hanger.
(8) Raise jacks just enough to support trunnion
tube.
(9) Remove four nuts, four washers, and four
bolts which fasten the trunnion hanger to the mounting
bracket. Repeat for opposite side.
(10) Slowly lower suspension and support
trunnion tube.
b.
Disassembly (Fig. 5-5).
(1)
(2)
u-bolts.
(3)
(4)
Use lifting device to support spring.
Remove four nuts and four washers
Remove two U-bolts and wear plate.
from
Using lifting device, lift spring from upper
trunnion hub and remove it from the suspension.
Change 3
5-17
Back to Top

