TM-9-2350-261-34 - Page 584 of 785
TM 9-2350-261-34
INSTALL COMMANDER’S CUPOLA ARMOR SHIELDS (M113A2, M1059,
AND M1064 ONLY) — Continued
0074 00
6.
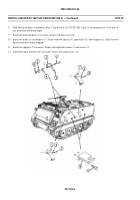
Remove locknut (1), two flat washers (2), and cap screw (3) that secure hook (4), spring (5), and two spacers (6) on
cupola hatch. Discard hook. Keep all other parts.
7.
Place new hook (4), spring (5), and two spacers (6) on cupola hatch. Secure with two flat washers (2), cap screw (3), and
locknut (1).
8.
Remove locknut (7) and flat washer (8) that secure bumper (9) and flat washers (10) to cupola hatch. Remove bumper
and washers. Keep washers. Discard locknut.
9.
Place new bumper extension bracket (11) on cupola hatch with welded end up. Secure with new cap screw (12), flat
washer (13), and locknut (14).
10. Use flat washers (10), as needed, to compress bumper 1/4 inch (6 mm) when cover is open and latched. Place flat
washers (10) and bumper (9) on bracket (11). Secure with flat washer (8) and new locknut (7).
NOTE
Gun shields are large and bulky. Get an assistant to help you.
11. Install curved doors (15) in guide channels of shields (16) and (17). There are two doors in each shield. Install four clips
(18) to secure doors open. Bend clips to turn freely around loop on doors.
12. Place left and right shields (16) and (17) on cupola. Secure with two retained flat washers (19), two cap screws (20), four
flat washers (21), four lockwashers (22), and four cap screws (23).
13. Remove two cap screws (24) and lockwashers (25) that secure plastic covered stop (26) on machine gun support.
Remove stop. Discard stop, screws, and lockwashers.
14. Place spacer (27) and bracket (28) on machine gun support. Secure with two machine screws (29).
15. Install flat door (30) in slots in bracket (28). Install four hooks (31). Close hooks to form a chain from loop on door
to loop on bracket.
007400-3
Back to Top


