TM-9-2350-311-20-2 - Page 554 of 828
TM 9–2350–311–20–2
12–12
Change 2
12–3 CUPOLA COVER, BODY, AND HANDLE — CONTINUED
c.
Assembly — Continued
NOTE
Step 14 applies to cupola covers without outside handle.
14
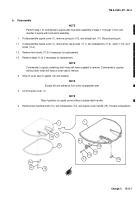
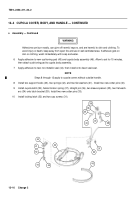
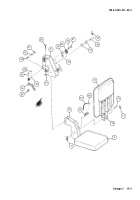
Install cupola cover handle (15) using two new lockwashers (14) and two machine bolts (13).
WARNING
Adhesives can burn easily, can give off harmful vapors, and are harmful to skin and clothing. To
avoid injury or death, keep away from open fire and use in well-ventilated area. If adhesive gets on
skin or clothing, wash immediately with soap and water.
NOTE
If commander’s cupola does not have drain holes perform step 15. If commander’s cupola has drain
holes perform step 15.1.
15
Apply adhesive to new cover seal (12) and cupola cover (1). Allow to set 15 minutes then attach cover seal
to cupola cover.
15.1
Apply epoxy adhesive to new gasket (12) and cupola cover (1). Allow to set 15 minutes than attach gasket
to cupola cover.
NOTE
Perform step 16 for commander’s cupola with hook latch assembly or steps 16.1 through 16.3 for
commander’s cupola with knob latch assembly.
16
Install straight pin (11) and new spring pin (10).
13
12
10
11
1
14
15
Back to Top

