TM-9-2350-311-20-2 - Page 560 of 828
TM 9–2350–311–20–2
13–4
Change 2
13–1 COMMANDER’S SEAT AND SUPPORT POST GROUP — CONTINUED
b.
Disassembly
1
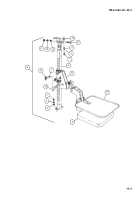
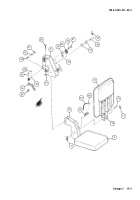
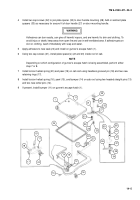
Remove two permanent washers (17) and headless shoulder pin (18) from brackets (19) on seat (9) and
backrest (10).
2
Withdraw quick-release pin (20), remove chain (20.1) and s-hook (20.2) from brackets (19) on seat (9) and
backrest (10).
3
Separate backrest (10) from seat (9).
4
Remove four machine screws (21), four lockwashers (22), two rollers (23), and nut and bolt retainers (24)
from seat carriage (8). Discard lockwashers.
5
Remove permanent washer (25), headless shoulder pin (26), and two rollers (27) from seat carriage (8).
Discard permanent washer.
6
Remove x-washer (27.1) and headed grooved pin (28) from manual control handle (16) on seat carriage (8).
7
Remove headless grooved pin (29) from rod end clevis (30) on seat carriage (8). This will release flat wash-
er (31), spring (32), and sleeve bushing (33).
8
Remove headed grooved pin (34) and x-washer (35) from rod end clevis (30) to release manual control han-
dle (16).
c.
Assembly
1
Install rod end clevis (30) on manual control handle (16) using headed grooved pin (34) and x-washer (35).
2
Install sleeve bushing (33), spring (32), and flat washer (31) on rod end clevis (30). Install rod end clevis on
seat carriage (8) using headless grooved pin (29).
3
Install headed grooved pin (28) and x-washer (27.1) on manual control handle (16).
4
Install headless shoulder pin (26), two rollers (27), and new permanent washer (25) on seat carriage (8).
5
Using four machine screws (21), four new lockwashers (22), and nut and bolt retainers (24), install two roll-
ers (23) on seat carriage (8).
6
Install backrest (10) on seat (9) using quick-release pin (20), chain (20.1) and s-hook (20.2).
7
Install headless shoulder pin (18) and two permanent washers (17) on brackets (19).
Back to Top


