TM-9-2815-205-34 - Page 316 of 596
TM 9-2815-205-34
3-50. PISTON AND CONNECTING ROD MAINTENANCE - TRUNK (MODELS 5063-5299,
5063-5395, AND 5063-5398) (Cont)
NOT E
•
Thickness gages must be
perfectly flat and free of nicks
and bends.
•
Select a thickness gage thick-
ness requiring six pounds pull
to move. Piston to liner clear-
ance is 0.001 inch greater than
thickness of thickness gage
used. For example, a 0.004
inch thickness gage indicates
0.005 inch clearance when
withdrawn with a six pound
pull.
(2)
(3)
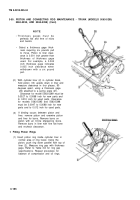
With cylinder liner (2) in cylinder block,
hold piston (13) upside down in liner and
measure clearance in four places, 90
degrees apart, using a thickness gage
(20) attached to a spring scale (21).
CIearance for model 5063-5299 must be
0.0027 to 0.0068 inch for new parts and
to 0.010 inch for used parts. Clearance
for models 5063-5395 and 5063-5398
must be 0.0047 to 0.0088 inch for new
parts and to 0.012 inch for used parts.
If binding occurs between piston and
liner, remove piston and examine piston
and liner for burrs. Remove burrs on
piston with an X-fine sharpening stone.
Remove burrs in liner with fine flat hone
and recheck clearance.
f. Fitting Piston Rings
(1) Insert piston ring inside cylinder liner in
normal area of ring travel. Using the
piston, push ring down parallel with top of
liner (2). Measure ring gap with thickness
gage. Refer to Table 3-6 for ring gap
specifications. Repeat procedure for
balance of compression and oil rings.
3-186
Back to Top


