TM-9-2815-225-34-P - Page 378 of 736
TM 9-2815-225-34&P
0042 00
0042 00-24
CYLINDER BLOCK COMPONENTS INSTALLATION (Contd)
FLYWHEEL, FLEXPLATE, AND FLYWHEEL HOUSING (Contd)
12.
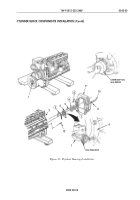
Install dial gauge attachment and dial indicator on crankshaft (5).
13.
Using chalk, mark flywheel housing (2) at 12, 3, 6, and 9 o’clock positions.
NOTE
If runout exceeds 0.008 in. (0.203 mm), move flywheel housing
horizontally one-half distance of total indicator reading. Use
prybars to move housing. If runout exceeds 0.008 in.
(0.203 mm), move flywheel housing vertically one-half distance
of total indicator reading. Use prybars to move housing. Total
indicator reading must not exceed 0.008 in (0.203 mm). Adjust
flywheel housing until within limit.
14.
Check readings at 3 o’clock and 9 o’clock positions.
15.
Check readings at 12 o’clock and 6 o’clock positions.
16.
After readings are within limits, tighten screws (3) 140–160 lb-ft (190–217 N
•
m) in sequence
shown in figure 14.
17.
Adjust dial indicator to measure alignment of face on flywheel housing (2).
18.
Push crankshaft toward front of cylinder block (1) to remove crankshaft end clearance.
NOTE
Ensure crankshaft is pushed toward front of cylinder block
when checking alignment. Total indicator reading must not
exceed 0.008 in. (0.203 mm). If alignment is not within limits,
remove flywheel housing and check mating surfaces.
19.
Rotate crankshaft (5) and check alignment of face on flywheel housing (2).
20.
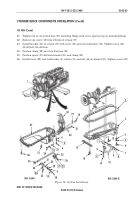
If dowel pins (4) were removed from cylinder block (1), use drill and fixture to ream dowel holes to
next oversize and install two new dowel pins (4), if required.
Back to Top


