SMI-9-2320-387-14P-1 - Page 318 of 671
This task covers:
a. Removal
b. Installation
INITIAL SETUP:
Applicable Models
M1152
Tools
General mechanic’s tool kit:
automotive (Appendix B, Item 1)
Manual References
TM 9-2320-387-10
TM 9-2320-387-24P
Equipment Condition
Battery ground cable disconnected (para. 4-68).
a. Removal
b. Installation
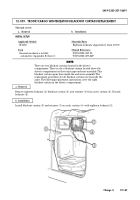
1.
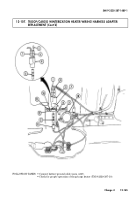
Remove nut (7) from box (3).
2.
Remove two screws (2), box (3), and switch (9) from upper side channel (1) and lower side channel
(4).
3.
Inspect decal (8) and remove from box (3) if decal (8) is damaged or illegible.
NOTE
Prior to removal, tag leads for installation.
4.
Remove three screws (5), washers (11), and leads 711A (6), 1B (12), and 712A (10)
from switch (9).
NOTE
Ensure lead 711A is positioned on top switch contact, and keyway
is on bottom of switch.
1.
Install leads 711A (6), 1B (12), and 712A (10) on switch (9)
with three washers (11) and screws (5).
Do not tighten screws (5).
2.
Install decal (8) on box (3), if removed.
NOTE
Ensure keyway in switch is toward the BLACKOUT position
on box when installed.
3.
Install switch (9) on box (3) with nut (7).
4.
Tighten three screws (5) installed in step 1.
NOTE
Ensure electrical harness lead are not binding during box
installation.
5.
Install box (3) on upper side channel (1) and lower side channel (4) with two screws (2).
SMI 9-2320-387-14&P-1
12-170
Change 4
12-111. TROOP/CARGO WINTERIZATION BLACKOUT/DOME LIGHT SWITCH
REPLACEMENT
Back to Top


