TM-9-2320-272-23-2 - Page 481 of 1417
INSTALLATION
1.
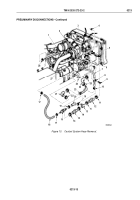
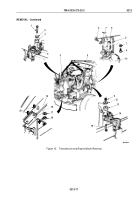
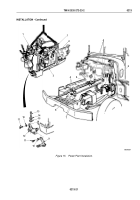
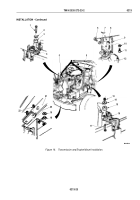
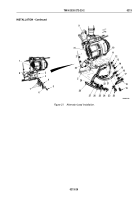
Install chain on two engine lifting brackets (Figure 15, Item 1).
2.
Install lifting device on chain. Raise lifting device enough to remove slack from chain.
3.
Install two isolators (Figure 15, Item 15), washers (Figure 15, Item 14), and screws (Figure 15, Item 13) on
front engine mount (Figure 15, Item 12).
4.
Install two radiator brackets (Figure 15, Item 9) on front engine mount (Figure 15, Item 12) with two washers
(Figure 15, Item 10) and screws (Figure 15, Item 11).
WARNING
•
All personnel must stand clear during lifting operations. A snapped cable, or swinging or
shifting load, may occur. Failure to comply may result in injury or death to personnel.
•
Do not put hands between frame and engine supports during lowering operations. Use
prybar to adjust position of engine lowering operations. Failure to comply may result in
injury or death to personnel.
NOTE
Chain must be adjusted so transmission points downward to allow clearance of engine over
front axle.
5.
Raise engine (Figure 15, Item 3) and transmission (Figure 15, Item 2) and position on vehicle.
CAUTION
Do not lower engine completely. Ensure all attaching components are clear and free from
obstruction. Failure to do so may cause damage to engine components.
6.
Position two washers (Figure 15, Item 7) and six isolators (Figure 15, Item 4) on crossmember
(Figure
15,
Item
8) and left (Figure 15, Item 6) and right (Figure 15, Item 5) engine mounts.
7.
Slowly lower engine (Figure 15, Item 3) and transmission (Figure 15, Item 2) into vehicle.
8.
Level engine (Figure 15, Item 3) and align screws (Figure 15, Item 13) with holes in crossmember
(Figure
15,
Item 8).
9.
Lower engine (Figure 15, Item 3) until it rests on crossmember (Figure 15, Item 8) and left (Figure 15, Item 6)
and right (Figure 15, Item 5) engine mounts.
TM 9-2320-272-23-2
0213
0213-20
Back to Top

