TM-9-2320-272-23-3 - Page 1318 of 1469
DUMP SPARE TIRE CARRIER INSTALLATION - Continued
5.
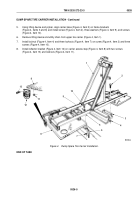
Using lifting device and prybar, align carrier base (Figure 4, Item 5) on frame brackets
(Figure 4, Items 3 and 6) and install screw (Figure 4, Item 2), three washers (Figure 4, Item 9), and screws
(Figure 4, Item 10).
6.
Remove lifting device and utility chain from upper tire carrier (Figure 4, Item 1).
7.
Install locknut (Figure 4, Item 4) and three locknuts (Figure 4, Item 7) on screw (Figure 4, Item 2) and three
screws (Figure 4, Item 10).
8.
Install reflector bracket (Figure 4, Item 12) on carrier access step (Figure 4, Item 8) with two screws
(Figure 4, Item 13) and locknuts (Figure 4, Item 11).
M5090DAA
11
8
9
10
7
6
5
4
3
2
1
8
13
12
Figure 4.
Dump Spare Tire Carrier Installation.
END OF TASK
TM 9-2320-272-23-3
0526
0526-5
Back to Top


