TM-9-2320-272-23-3 - Page 1316 of 1469
DUMP SPARE TIRE CARRIER REMOVAL - Continued
3.
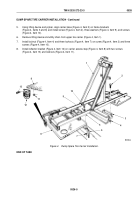
Attach utility chain (Figure 2, Item 2) to upper tire carrier (Figure 2, Item 1) and a suitable lifting device.
4.
Lift carrier base (Figure 2, Item 3) from vehicle and position on four jack stands (Figure 2, Item 4).
5.
Remove utility chain (Figure 2, Item 2) from upper tire carrier (Figure 2, Item 1).
6.
Remove six locknuts (Figure 2, Item 6), washers (Figure 2, Item 9), screws (Figure 2, Item 10), and bracket
assembly (Figure 2, Item 11) from carrier step (Figure 2, Item 5) and carrier base (Figure 2, Item 3).
Discard
locknuts.
NOTE
Assistant will support access steps during Step (7).
7.
Remove eight locknuts (Figure 2, Item 8), screws (Figure 2, Item 7), and two carrier steps (Figure 2, Item 5)
from carrier base (Figure 2, Item 3). Discard locknuts.
M5089DAA
5
4
3
2
1
6
7
8
9
11
10
9
6
Figure 2.
Dump Spare Tire Carrier Removal.
END OF TASK
TM 9-2320-272-23-3
0526
0526-3
Back to Top


