TM-9-2320-272-23-4 - Page 281 of 1393
INSTALLATION - Continued
WARNING
All personnel must stand clear during lifting operations. A snapped chain, or shifting or
swinging load, may result in injury to personnel. Failure to comply may result in injury or death
to personnel.
4.
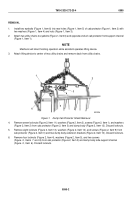
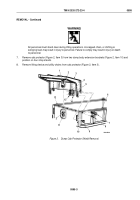
Remove cab protector (Figure 5, Item 3) from four shop stands and position on two dump body extension
brackets (Figure 5, Item 10).
5.
Using a drift pin, align mounting holes and install cab protector (Figure 5, Item 3) on two dump body extension
brackets (Figure 5, Item 10) with eight screws (Figure 5, Item 9), washers (Figure 5, Item 14), and locknuts
(Figure 5, Item 13).
6.
Install cab protector (Figure 5, Item 3) on left and right dump body side support channel (Figure 5, Item 6) with
two screws (Figure 5, Items 7 and 8), four washers (Figure 5, Item 5), and locknuts (Figure 5, Item 4).
7.
Install cab protector (Figure 5, Item 3) on dump body (Figure 5, Item 12) with seven washers
(Figure
5,
Item
2), screws (Figure 5, Item 1), washers (Figure 5, Item 2), and locknuts (Figure 5, Item 11).
8.
Remove lifting device and utility chains from cab protector (Figure 5, Item 3).
3
4
5
M9992DAA
1
2
6
7
8
9
10
11
12
13
14
2
Figure 5.
Dump Cab Protector Shield Installation.
TM 9-2320-272-23-4
0595
0595-6
Back to Top

