TM-9-2320-272-23-4 - Page 883 of 1393
INSTALLATION - Continued
3.
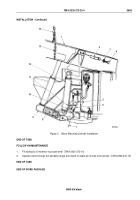
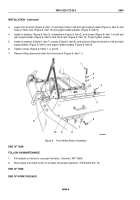
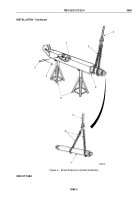
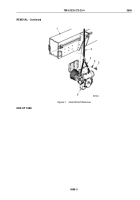
Lower front of winch (Figure 6, Item 11) and align holes of left and right support plates (Figure 6, Item 5) with
holes of frame rails (Figure 6, Item 10) and support plate brackets (Figure 6, Item 9).
4.
Install six washers (Figure 6, Item 3), lockwashers (Figure 6, Item 2), and screws (Figure 6, Item 1) on left and
right support plates (Figure 6, Item 5) and frame rails (Figure 6, Item 10). Finger tighten screws.
5.
Install six washers (Figure 6, Item 7), screws (Figure 6, Item 6), and locknuts (Figure 6, Item 8) on left and right
support plates (Figure 6, Item 5) and support plate brackets (Figure 6, Item 9).
6.
Tighten screws (Figure 6, Items 1, 4, and 6).
7.
Remove lifting device and chain from front winch (Figure 6, Item 11).
1
2
3
4
5
6
7
8
9
10
11
M5245DAA
Figure 6.
Front Winch Motor Installation.
END OF TASK
FOLLOW-ON MAINTENANCE
1.
Fill hydraulic oil reservoir to proper fluid level. (Volume 5, WP
0820)
2.
Start engine and check winch for oil leaks and proper operation. (TM 9-2320-272-10)
END OF TASK
END OF WORK PACKAGE
TM 9-2320-272-23-4
0694
0694-6
Back to Top

