TM-9-2320-272-24-2 - Page 240 of 991
TM 9-2320-272-24-2
3-332. REAR WINCH REPLACEMENT (Contd)
3.
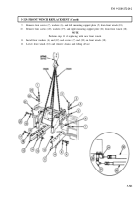
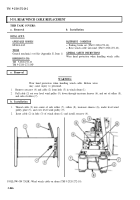
Rotate drive coupling (9) to access pin (4). Remove pin (4) and shear pin (2) from drive coupling (9).
4.
Remove two nuts (10), screws (14), and washers (13) from front motor bracket (12) and crane
body (11).
5.
Remove two nuts (5), washers (6), screws (8), and washers (6) from rear motor bracket (7) and crane
body (11).
6.
Slide winch motor (1) forward until clear of winch drive shaft (3).
7.
Secure chain around rear winch (15) and attach to hoist hook. Raise hoist (TM 9-2320-272-10) until
slack is removed from chain.
WARNING
All personnel must stand clear during lifting operations. A
snapped cable, or swinging or shifting load, may result in injury to
personnel.
NOTE
Mechanic will direct hoisting operation. Assistant will operate
hoist. Refer to TM 9-2320-272-10 for crane operating instructions.
8.
Remove four nuts (16), screws (19). and washers (18) from winch frame mounts (17) and crane
body (11).
9.
Remove rear winch (15) from vehicle.
10.
Remove chains from hoist hook and rear winch (15).
b. Installation
1.
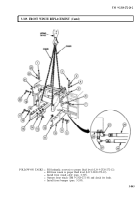
Secure chain around rear winch (15) and attach to hoist hook. Raise hoist until slack is removed
from chain.
WARNING
All personnel must stand clear during lifting operations. A
snapped cable, or swinging or shifting load, may result in injury to
personnel.
NOTE
Mechanic will direct hoisting operation. Assistant will operate
hoist. Refer to TM 9-2320-272-10 for crane operating instructions.
2.
Lift rear winch (15) into position on crane body (11) and align winch drive shaft (3) and winch frame
mounts (17).
3.
Remove chain from hoist hook and rear winch (11).
4.
Install four washers (18), screws (19), and nuts (16) on winch frame mounts (17) and crane
body (11).
3-848
Back to Top


