TM-9-2320-272-24-3 - Page 626 of 799
4-185. REAR
TM 9-2320-272-24-3
8.
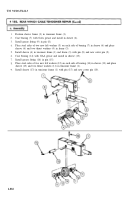
Remove elbow (7) and pipe nipple (6) from winch motor (8).
9.
Remove twelve screws (2), washers (3), and six clamps (4) from hydraulic motor (8).
NOTE
Tag hydraulic hoses for installation.
10.
11.
12.
13.
14.
15.
Remove three hydraulic hoses (1) and O-rings (5) from hydraulic motor (8). Discard O-rings (5).
Disconnect hydraulic hose (11) from elbow (10) on winch motor (8).
Remove elbow (10) and O-ring (9) from winch motor (8). Discard O-ring (9).
Disconnect two hose connectors (31) and (32) from tee (33).
Loosen setscrew (26) until flush with front coupling hub (14).
Remove tee (33), adapter (30), valve (29), and elbow (7) from pipe nipple (6). Tag valve (29) for
installation.
16.
Remove two locknuts (271, screws (20), and washers (21) from frame crossmember (22) and rear
bracket (28). Discard locknuts (27).
NOTE
Assistant will help with step 17.
17.
18.
19.
Remove winch motor (8) and rear bracket (28) from frame crossmember (22).
Remove key (13) from winch motor shaft (12).
Remove six screws (23), lockwashers (24), and rear bracket (28) from winch motor (8). Discard
lockwashers (24).
20.
Remove pipe nipple (6) from winch motor (8). Tag pipe nipple (6) for installation.
21.
Remove cotter pin (18) and shear pin (19) from rear coupling hub (16). Discard cotter pin (18).
22.
Remove coupling (15) from winch driveshaft (17).
1.
Align holes in rear coupling hub (16) and driveshaft (17) and install coupling (15) on winch
driveshaft (17) with shear pin (19) and new cotter pin (18).
NOTE
2.
Wrap all male pipe threads with antiseize tape before installation.
Install rear bracket (28) on winch motor (8) with six new lockwashers (24) and screws (23). Tighten
screws (23) 60-70 lb-ft (81-95 N•m).
NOTE
Assistant will help with step 3.
3.
Place key (13) in slot of winch motor shaft (12) and install winch motor (8) on coupling (15). Ensure
key (13) is visible in setscrew hole (25).
4.
5.
6.
7.
8.
9.
10.
Install rear bracket (28) on frame crossmember (22) with four washers (21), two screws (20), and
two new locknuts (27). Tighten locknuts (27) 60-70 lb-ft (81-95 N•m).
Install pipe nipple (6), elbow (7), valve (29), adapter (30), and tee (33) on winch motor (8).
Connect two hose connectors (31) and (32) to tee (33).
Apply adhesive sealant to threads of setscrew (26) and install in hole (25) in front coupling hub (14).
Install elbow (10) on winch motor (8) with new O-ring (9).
Connect hydraulic hose (11) on elbow (10).
Connect three hydraulic hoses (1) to winch motor (8) with new O-rings (5), six clamps (4), twelve
washers (3), and screws (2).
11.
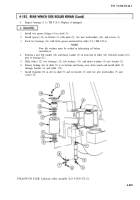
Install pipe nipple (17) and elbow (18) on winch motor (14) with elbow (18) pointed up.
4-890
Back to Top


