TM-9-2320-273-34 - Page 122 of 801
TM 9-2320-273-34
c.
Wire brush all welded areas. Remove any carbon or weld splatter.
d.
Inspect welded areas on step and fuel tank for good contour, continuity, cracks or any other weld-
ing defects.
e.
Rotate fuel tank back to its proper position, and retighten fuel tank straps.
f.
Air dry fuel tank to remove any remaining moisture.
Using shop air supply place air hose through
filler neck and air exhaust for about five minutes.
g.
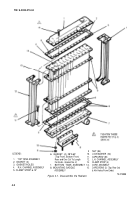
Install fuel sending unit, drain plug, inlet fuel line, return fuel line and air vent screw (4, 1,3, 5
and 2, fig. 3-8).
1.
2.
3.
4.
h.
DRAIN PLUG
5. FUEL LINE (RETURN)
AIR VENT SCREW
6. FUEL FILL NECK
FUEL LINE (PICKUP)
7. TOP STEP
FUEL SENDING UNIT
8. BOTTOM STEP
Figure
3-8.
Refuel tank and install filler cap. Relocate vehicle to a painting facility.
Wash welded area with enamel thinner and treat with a metal conditioner (phosphoric acid).
i.
Rinse off with clean water and air dry.
TA 239529
i.
Apply a coat of zinc chromate primer.
k.
Paint all exposed metal surface with an aerosol can, spray gun or brush. Match color of existing
exterior painted surface.
3-10
Change 2
Back to Top


