TM-9-2320-361-20 - Page 469 of 1207
TM 9-2320-361-20
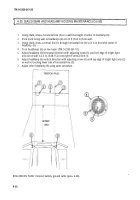
4-39. SEALED
BEAM AND HEADLAMP HOUSING MAINTENANCE (Contd)
a. Sealed Beam Removal
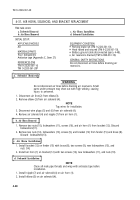
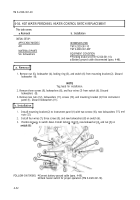
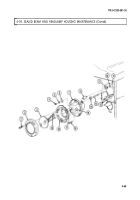
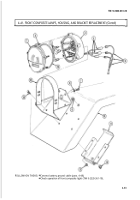
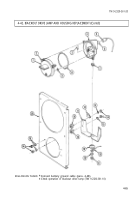
1. Remove three screws (1) and retaining ring (2) from headlamp housing (18).
NOTE
Tag all wires for installation.
2. Disconnect three wires (19) from connector plugs (13) and remove sealed beam (3).
b. Headlamp Housing Removal
1. Disconnect three wires (12) from three connector plugs (13) at rear of housing (7).
2. Remove three nuts (10), lockwashers (9), shock mounts (8), and housing (7), from body (11). Discard
lockwashers (9).
3. Loosen two adjusting screws (16) and remove spring (17) from headlamp housing (18).
4. Remove headlamp housing (18) from housing (7).
5. Remove two adjusting screws (16) and adjusting nuts (15) from housing (7).
6. Remove three nuts (4), lockwashers (5), washers (6), and shock mounts (8) from housing (7). Discard
lockwashers (5).
7. Remove three connector plugs (13) and grommets (14) from housing (7).
c. Headlamp Housing Installation
1. Install three grommets (14) and connectors (13) in housing (7).
2. Install three shock mounts (8) on housing (7) with three washers (6), new lockwashers (5), and nuts
(4).
3. Install two adjusting screws (16) and adjusting nuts (15) in housing (7).
NOTE
Adjusting nuts must move freely for lamp adjustment. Do not
bottom adjusting screws in step 4.
4. Install headlamp housing (18) on adjusting screws (16) and tighten adjusting screws (16) evenly.
5. Install spring (17) on housing (18) and adjusting screw (16).
6. Install housing (7) on body (11) with three shock mounts (8), new lockwashers (9), and nuts (10).
7. Connect three wires (12) to connector plugs (13).
d. Sealed Beam Installation
1. Connect three wires (19) to connector plugs (13).
2. Install sealed beam (3) in headlamp housing (18) with retaining ring (2) and three retaining screws
(1).
4-58
Back to Top

